Module 9: Intermediate Network Traffic Analysis
These are my notes for Module 9. Where Module 8 was about learning the tools, this one is about recognizing attacks in a capture, working up the stack one layer at a time. It starts at the link layer with ARP poisoning and wireless attacks, moves through network and transport anomalies like fragmentation, spoofing, TTL evasion and the full set of TCP scan patterns, then finishes at the application layer with HTTP fuzzing, request smuggling, TLS renegotiation and DNS abuse. Every section is a filter and a signature to look for.
Note on the captures: every PCAP referenced here (
ARP_Spoof.pcapng,deauthandbadauth.cap,rogueap.cap,nmap_frag_fw_bypass.pcapng,funky_dns.pcap,funky_icmp.pcapand the rest) comes from the HTB Academy module resources for this module. They are not files you need to find or generate yourself. If you are following along, download them from the module’s resource section on HTB Academy.
Back to Module 8: Module 8: Intro to Network Traffic Analysis
Module 9 Navigation
On this page
- Link-layer attacks
- ARP spoofing and poisoning
- ARP scanning and DoS
- 802.11 deauthentication
- Rogue AP vs Evil-Twin
- Detecting network abnormalities
- IP fragmentation
- IP source and destination spoofing
- IP TTL attacks
- TCP handshake abnormalities
- TCP resets and hijacking
- ICMP tunneling
- Application-layer attacks
- HTTP fuzzing
- Strange HTTP headers and smuggling
- XSS and code injection
- SSL and TLS renegotiation
- DNS abuse
- Telnet and UDP tunneling
- Skills Assessment
- Key Takeaway
- References
Link-Layer Attacks
The lowest layer is where a lot of local network attacks live, because the protocols there were built for a trusted LAN and never got proper verification. ARP and 802.11 management frames both assume everyone is honest, and that assumption is what gets abused.
ARP Spoofing and Poisoning
Under normal conditions, hosts on a local network need each other’s MAC addresses to actually move data, and the Address Resolution Protocol handles that mapping dynamically. Host A checks its local ARP cache for the destination IP. If it is not there, it broadcasts a request asking who holds that IP. The host that owns it replies directly with its IP-to-MAC mapping, and Host A saves that into its cache. That is the whole vanilla flow, and nowhere in it is there any check that the reply is telling the truth.
That missing verification is the entire attack. An attacker sends unsolicited, counterfeit ARP messages to both the victim and the local router. The victim is told the router’s IP maps to the attacker’s MAC, and the router is told the victim’s IP maps to the attacker’s MAC. Once both caches are poisoned, all traffic between them passes through the attacker. From there the attacker can drop the packets for a Denial of Service, or forward them along for a Man-in-the-Middle position where they read or alter the data in transit.
The rest of this section is how that looks inside ARP_Spoof.pcapng in Wireshark. The footprints are not subtle once you know what to filter for.
The first red flag is a single host incessantly broadcasting rapid ARP requests and replies across the network.
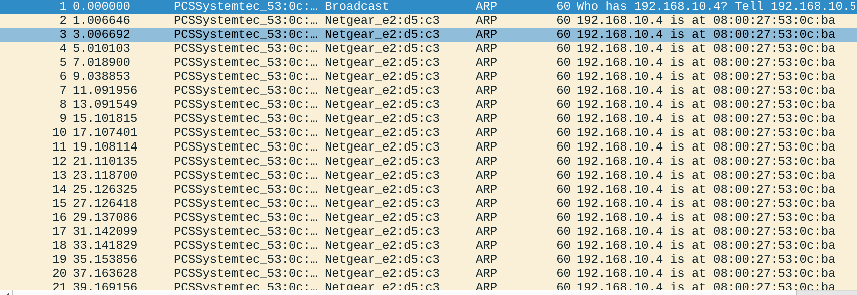
To dig in, isolate the ARP requests (Opcode 1):
arp.opcode == 1

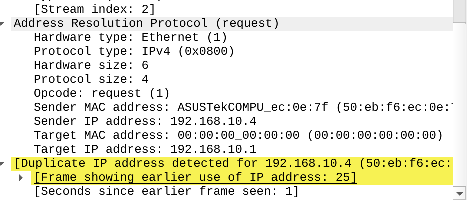
Wireshark helps here by automatically flagging duplicate address usage when two different MAC addresses claim the same IP, such as the conflict on 192.168.10.4. It highlights the frame with a duplicate use warning banner.
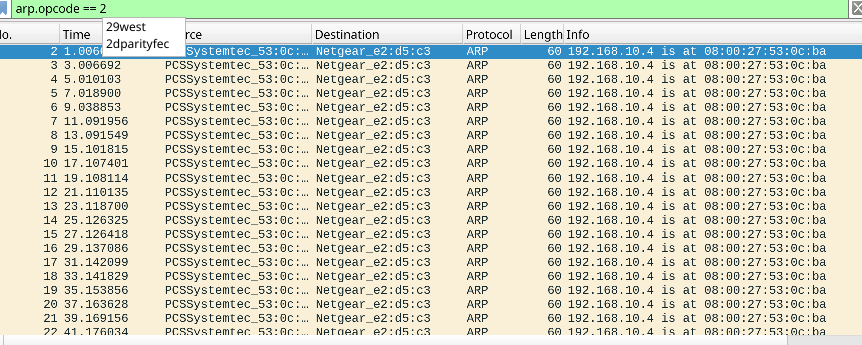
Then flip to the replies (Opcode 2), which are the frames actually poisoning the caches:
arp.opcode == 2
To confirm the attack landed on a target host, you can query its local ARP cache from the CLI. A compromised cache lists two distinct MAC addresses pointing at the same IP:
secsavvy@htb[/htb]$ arp -a | grep 50:eb:f6:ec:0e:7f
? (192.168.10.4) at 50:eb:f6:ec:0e:7f [ether] on eth0

secsavvy@htb[/htb]$ arp -a | grep 08:00:27:53:0c:ba
? (192.168.10.4) at 08:00:27:53:0c:ba [ether] on eth0
Back in the capture, you can pull every duplicate reply record at once with:
arp.duplicate-address-detected && arp.opcode == 2
The more interesting move is unmasking the attacker’s real IP. An attacker has to interact legitimately on the subnet before they start spoofing, so their MAC has a history. Isolate all traffic for the suspicious MAC (08:00:27:53:0c:ba):
(arp.opcode) && ((eth.src == 08:00:27:53:0c:ba) || (eth.dst == 08:00:27:53:0c:ba))
Reading the Sender IP field (arp.src.proto_ipv4) chronologically tells the story. Early on, that MAC maps to its own legitimate address (192.168.10.5). Later, the same MAC starts sending replies claiming the victim’s IP (192.168.10.4), and that switch is the exact moment the spoof begins.
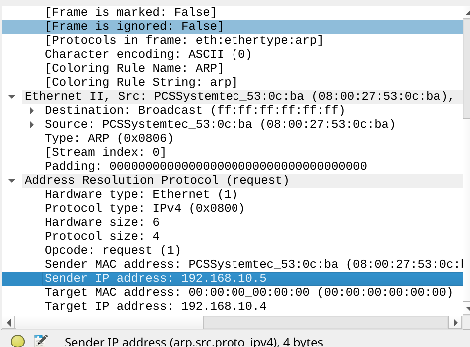
Finally, to work out whether this was a DoS or a MITM, filter for all traffic flowing through both MAC addresses:
eth.addr == 50:eb:f6:ec:0e:7f or eth.addr == 08:00:27:53:0c:ba
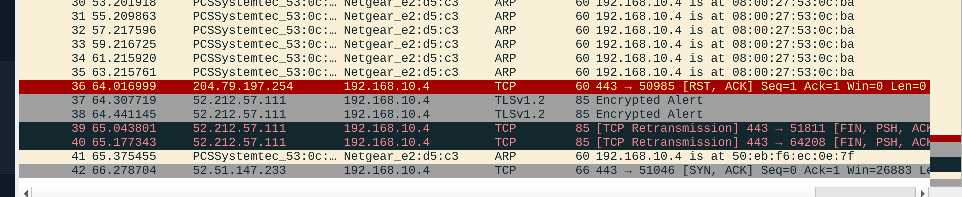
The TCP behaviour is the tell. If the connections drop or fail continuously, the attacker is not forwarding anything and it is a Denial of Service. If instead you see symmetrical transmissions, victim to attacker and then attacker to router, that confirms an active Man-in-the-Middle.
On the defence side, the two practical mitigations are static ARP entries for critical resources like gateways, which stop the cache from being modified dynamically at the cost of admin overhead, and switch or router port security so only authorised devices can connect to a given port.
ARP Scanning and Denial of Service
ARP is also useful to an attacker before any poisoning happens, as a way to map out who is alive on the local network. This kind of sweep is very characteristic of automated tooling like Nmap, and in ARP_Scan.pcapng it shows up as an unusual volume of broadcast ARP requests sent sequentially to every address on the subnet, including hosts that do not exist. When the live devices answer with replies, the scanner has its map of active targets.
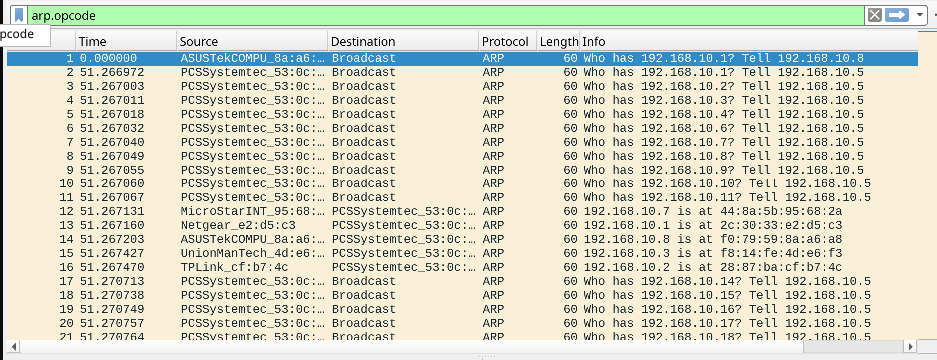
Once the live hosts are known, the attacker can escalate from passive scanning to actively poisoning the whole subnet, which is what ARP_Poison.pcapng captures. The attacker tries to manipulate as many caches as possible to set up a MITM or a DoS. They corrupt the router by declaring new physical addresses for all the live IPs, and at the same time corrupt the clients by sending duplicate allocations of the default gateway IP (192.168.10.1). That forces client caches to associate the gateway with the attacker’s MAC and obstructs traffic in both directions, and again Wireshark flags the duplicate IP mappings with warning banners.

Detecting these link-layer anomalies matters because stopping them here prevents data exfiltration from higher layers later. When you spot one, the response is to trace the physical connection point of the attacker’s machine, keeping in mind that the orchestrating device is often a legitimate internal host that has been compromised and is being controlled remotely, and then to contain it by isolating the affected segment at the switch or router to kill the DoS or MITM at its source.
802.11 Deauthentication Attacks
Wireless has its own version of the same trust problem. Because standard 802.11 management frames are unencrypted, an attacker can spoof the MAC of a legitimate Access Point and send fake deauthentication frames to a client, forcing it to disconnect. They do this to harvest the WPA 4-way handshake when the client reconnects (for offline dictionary cracking), to cause plain DoS by disrupting connectivity, or to push clients off the real network so they reconnect to a rogue AP.
To capture raw 802.11 frames for this kind of analysis, the wireless interface has to be in monitor mode. With airmon-ng, you first kill anything that would interfere and then start monitor mode:
sudo airmon-ng check kill
sudo airmon-ng start wlan0
That should give you a monitor interface named something like wlan0mon. If airmon-ng is not available, you can cycle the interface manually and confirm the mode with iwconfig:
sudo ifconfig wlan0 down
sudo iwconfig wlan0 mode monitor
sudo ifconfig wlan0 up
Then capture with airodump-ng, giving it the channel, the target AP’s BSSID and an output prefix:
sudo airodump-ng -c 4 --bssid F8:14:FE:4D:E6:F1 wlan0 -w raw
With a capture like deauthandbadauth.cap open in Wireshark, you narrow down to the attack step by step. First limit to the AP:
wlan.bssid == F8:14:FE:4D:E6:F1
Then isolate the actual deauthentication frames, which are management frames (type 00) of subtype 12:
(wlan.bssid == F8:14:FE:4D:E6:F1) and (wlan.fc.type == 00) and (wlan.fc.type_subtype == 12)
Management frames cover beacon, probe request, probe response, authentication, association, deauthentication and disassociation, and the subtype is what pins it to deauth specifically. Seeing an excessive volume of deauth frames aimed at a single client in a short window is the sign of an active attack.
Standard tools like aireplay-ng and mdk4 use Reason Code 7 (Class 3 frame received from nonassociated STA) by default, so you can filter straight for that signature:
(wlan.bssid == F8:14:FE:4D:E6:F1) and (wlan.fc.type == 00) and (wlan.fc.type_subtype == 12) and (wlan.fixed.reason_code == 7)
More careful attackers try to slip past a WIDS or WIPS by rotating the reason code sequentially in their script, so you have to check the other codes too by incrementing the value:
- Check Code 1:
... and (wlan.fixed.reason_code == 1) - Check Code 2:
... and (wlan.fixed.reason_code == 2) - Check Code 3:
... and (wlan.fixed.reason_code == 3)
| Reason code | Meaning | Simple explanation |
|---|---|---|
1 |
Unspecified reason | “Disconnecting you, but no clear reason given.” |
2 |
Previous authentication no longer valid | “Your login/authentication is no longer accepted.” |
3 |
Deauthenticated because station is leaving | “The device/AP says it is leaving the network.” |
If an attacker is instead trying to flood or brute-force their way onto the AP, you get a high rate of connection attempts. Isolate association requests, association responses and authentication frames (subtypes 0, 1 and 11) to see it:
(wlan.bssid == F8:14:FE:4D:E6:F1) and (wlan.fc.type == 00) and ((wlan.fc.type_subtype == 0) or (wlan.fc.type_subtype == 1) or (wlan.fc.type_subtype == 11))
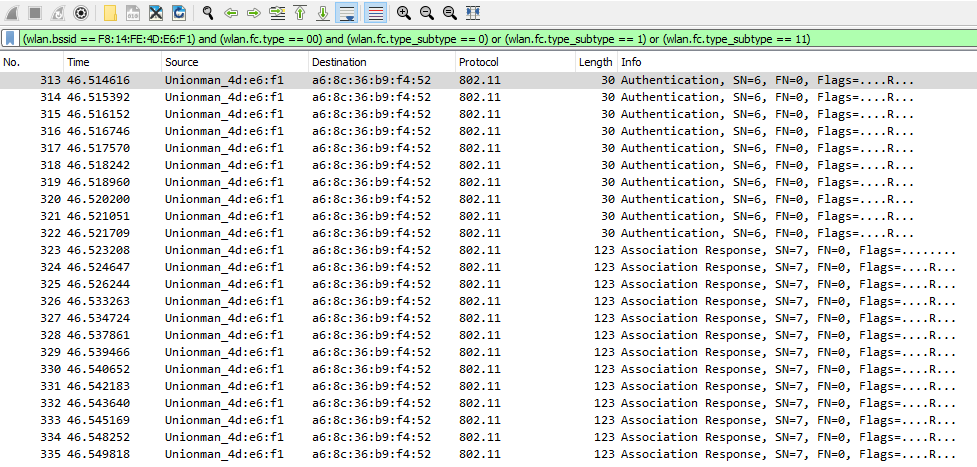
The mitigations here are about protecting the management frames themselves. Enabling 802.11w Management Frame Protection cryptographically signs them so attackers cannot forge deauth messages, upgrading to WPA3-SAE brings protected management frames in by default, and WIDS/WIPS rules should flag rapid bursts of subtype 12 or reason-code sequence anomalies.
Rogue AP vs Evil-Twin
Both of these involve an unauthorised access point, but they differ in how they attach to the network and what they are after. A Rogue AP is a physical device plugged directly into your internal network, used to bypass perimeter controls, segmentation or air-gaps and act as a backdoor into restricted zones. An Evil-Twin is a standalone AP that is not connected to your network at all. The attacker stands one up nearby, mirrors your legitimate ESSID, and usually runs a web server on it to conduct a hostile portal attack that steals wireless passwords, domain credentials or session values from clients that connect.
You can spot an active Evil-Twin over the air by filtering for your ESSID in airodump-ng:
sudo airodump-ng -c 4 --essid HTB-Wireless wlan0 -w raw
If an attack is running, you see multiple APs on the same ESSID and channel but with a crucial difference. The legitimate AP runs WPA2 CCMP PSK (BSSID F8:14:FE:4D:E6:F1), while the deceptive twin runs as an open network with no encryption (BSSID F8:14:FE:4D:E6:F2). That open duplicate is a strong indicator of a hostile portal, and you should also watch for concurrent deauth bursts, which the attacker uses to force clients off the real AP and onto the open twin.
To confirm it in rogueap.cap, start with the beacon frames, which are the frames an AP uses to announce that a network exists:
(wlan.fc.type == 00) and (wlan.fc.type_subtype == 8)
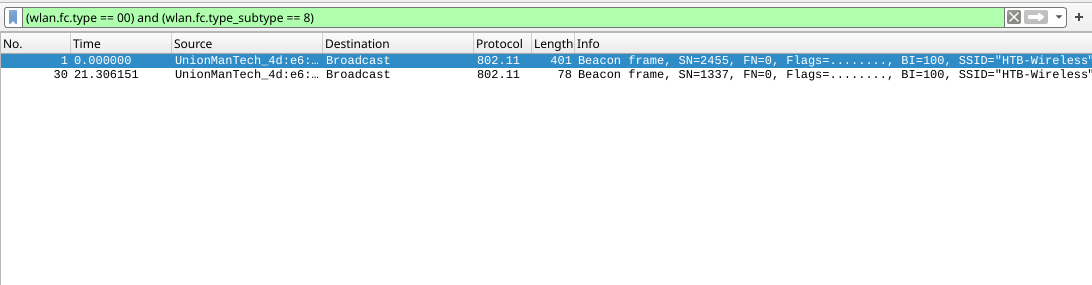
The logic is just wlan.fc.type == 0 for a management frame and wlan.fc.type_subtype == 8 for the beacon subtype, so type 0 plus subtype 8 equals a beacon frame, which is an AP saying “this Wi-Fi network exists.”
Selecting a beacon from each BSSID and reading its Robust Security Network (RSN) details tells you the ciphers each one supports. On the legitimate AP, the RSN field confirms WPA2 with AES and TKIP using PSK authentication.
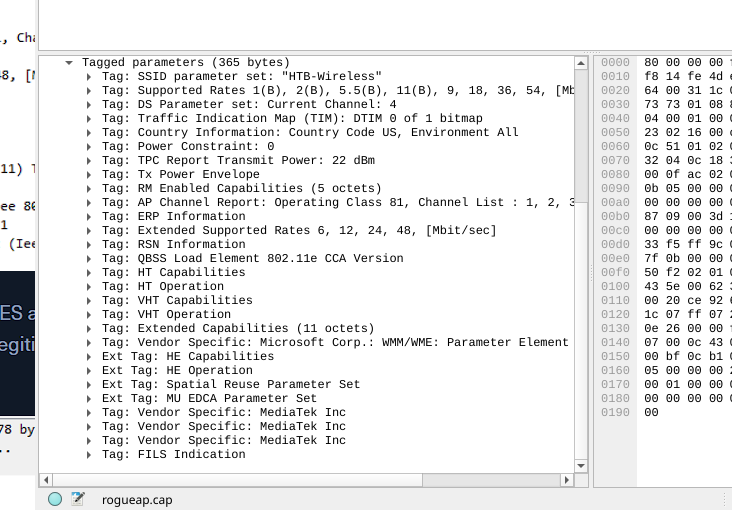
On the basic Evil-Twin, the RSN information block is conspicuously missing from the beacon, which confirms the unencrypted rogue state.
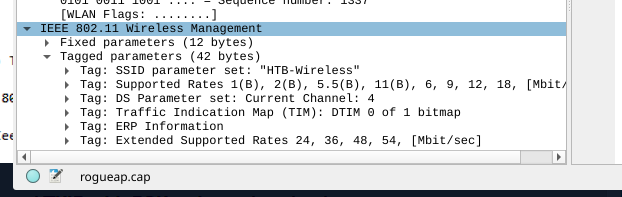
A more sophisticated attacker will configure their fake AP to copy your exact cipher suite so the RSN check does not give them away. In that case you inspect the beacon’s vendor-specific information, because the legitimate hardware vendor’s signature and proprietary tags are almost always absent from the attacker’s software-generated frames.
Because open-network Evil-Twins run without encryption, you can inspect higher-level traffic to find who actually connected. Filter for the suspicious BSSID:
wlan.bssid == F8:14:FE:4D:E6:F2
The indicator of compromise to look for is client-side ARP probes, like “Who has 169.254.63.254?”, coming from a device while it is associated with the fake BSSID. That confirms a victim connected. When you find one, record its MAC address and hostname from the frames, use those to isolate the physical machine, trigger immediate password resets for any domain accounts tied to that user, and sanitise the device.
Two habits keep this from happening quietly. Regular rogue AP audits of your wired device lists catch genuine rogue APs, since they are plugged into your switches and leave a MAC or IP entry on the switchport tables. And vicinity scans for strong, unencrypted signals near your office footprint catch the tethered hotspots that users set up to bypass perimeter firewalls.
Detecting Network Abnormalities
Moving up a layer, the attacks shift from poisoning local mappings to manipulating IP and TCP fields directly, mostly to evade inspection or exhaust a target. The common thread is that the fields being abused (fragment offset, source IP, TTL, TCP flags) are all things a defender can read straight out of the packet.
IP Fragmentation
Fragmentation itself is normal. The IP layer only moves packets hop to hop and cannot detect loss or tampering, that is left to higher layers, and the Maximum Transmission Unit (MTU) sets the largest packet a network can carry. When data exceeds the MTU, the source splits it into equal-sized fragments and the Fragment Offset in each IP header tells the destination how to put them back together.
Attackers abuse that reassembly step in a few ways. They split scan packets into tiny fragments to slip past security controls that inspect without reassembling first. They send extremely small fragments (10, 15 or 20 bytes) to exhaust a security tool’s reassembly resources. And they send fragments that reassemble into an oversized packet beyond 65,535 bytes to crash legacy systems. The defence against all of these is delayed reassembly, forcing the firewall or IDS to reconstruct every fragment before it inspects anything.
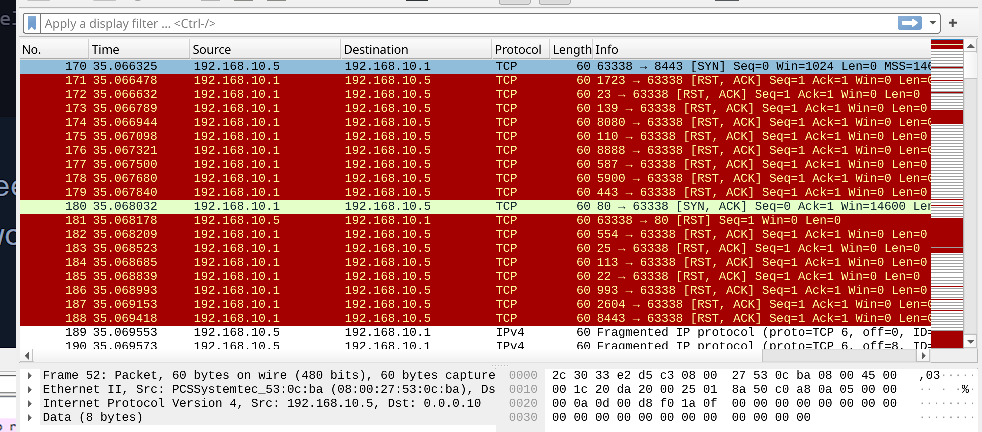
In nmap_frag_fw_bypass.pcapng this plays out in three beats. The scan opens with a simple ICMP ping request and reply for host discovery. Then the attacker runs nmap -f 10 <host ip> to force a maximum fragment size of 10 bytes, which shows up as a sudden spike of fragmented IP traffic from one host.
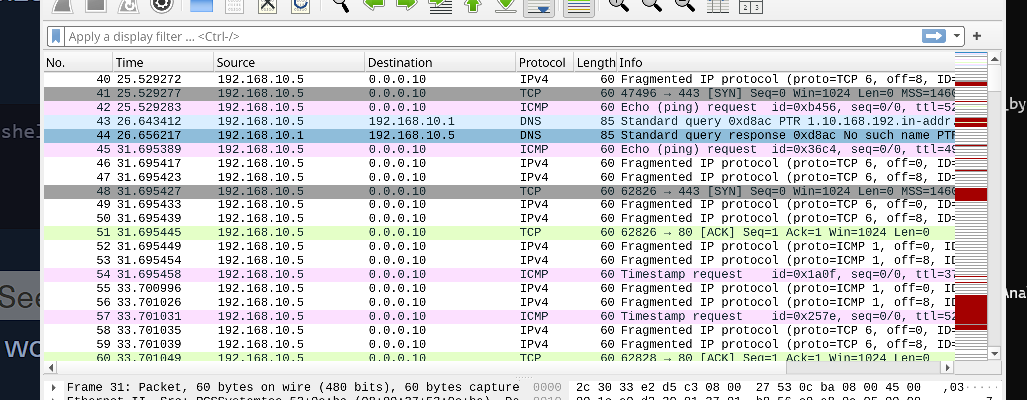
The definitive signature, though, is a single host scanning many different ports, with closed ports answering by TCP RST.
If Wireshark is not showing the reassembled data automatically, enable “Reassemble fragmented IPv4 datagrams” in the IPv4 protocol preferences.
IP Source and Destination Spoofing
Most of the spoofing attacks in this module come down to one rule: the source IP for outgoing traffic should always be from your local subnet, regardless of whether the traffic is inbound or outbound. An incoming packet whose source IP is from outside your LAN is a sign of packet crafting, and outgoing traffic with a source from a different range means malicious traffic is originating inside your network. Everything below is a variation on faking that source field.
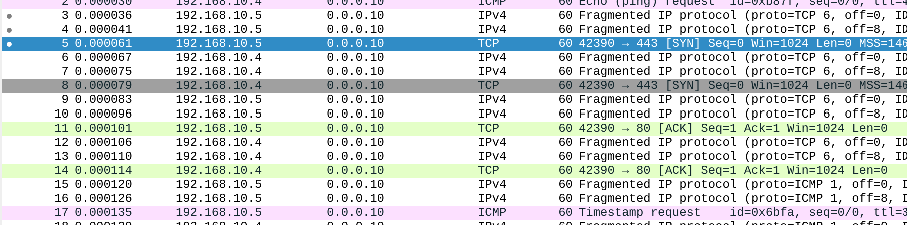
Decoy scanning is about acting as a local or trusted source to bypass firewall restrictions and enumerate a host in another segment, and it is captured in decoy_scanning_nmap.pcapng. In the first phase you see initial fragmentation from fake addresses alongside some legitimate TCP traffic from the real source.
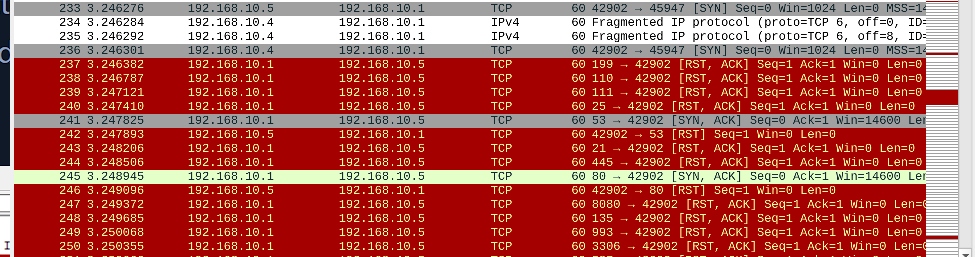
In the second phase the target responds to closed ports with TCP RST flags back to the attacker.

The detection logic is a chain rather than any single packet. Fragmented packets from one or more source IPs, plus TCP SYN or probe traffic to target ports, plus the target replying RST/ACK for closed ports, and all of it repeating quickly across multiple sources and ports, adds up to suspicious scanning. A single RST/ACK is completely normal, but that whole pattern together points at decoy or fragmented scanning. Reading it more closely, 10.5 is the real attacker scanning directly to learn the actual port results, while 10.4 is decoy traffic added to confuse attribution and clutter the target’s logs so it looks like multiple hosts scanned it.
Preventing it comes down to two things. Configure your IDS, IPS or firewall to act as the destination host would and reconstruct the fragments, which makes the malicious activity obvious, and watch connection ownership, because the attacker eventually has to reveal their true source address to actually receive and read the open-port responses.
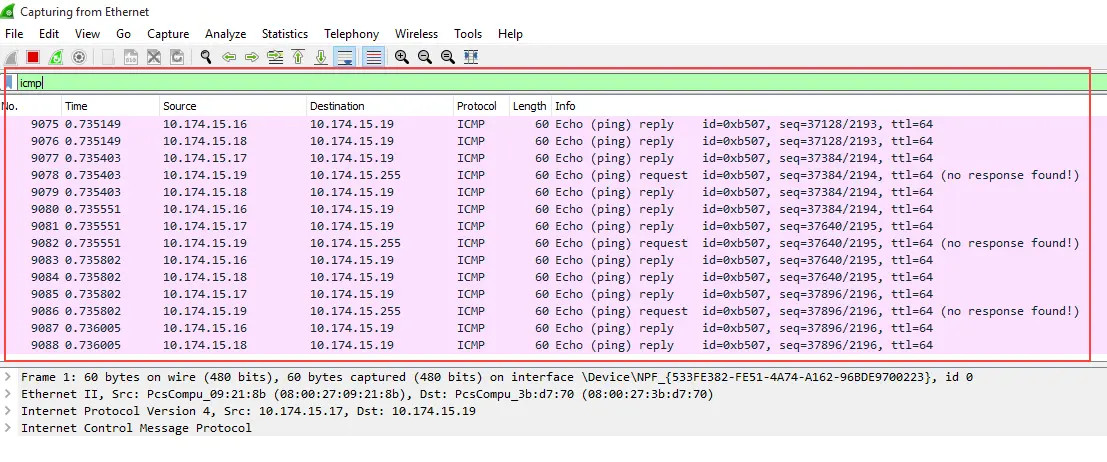
Smurf attacks are a one-to-many, distributed DoS. The attacker sends a large volume of ICMP requests to live hosts with the source IP spoofed to the victim’s address, so all those hosts dutifully send their ICMP replies to the victim. What you look for is an excessive amount of ICMP replies arriving at the affected host, or many different hosts pinging your single host. Attackers sometimes pad these ICMP requests with fragmentation and extra data to push the traffic volume, and the resource exhaustion, even higher.
Random source attacks flood a single port on the victim using randomised, spoofed source IPs, and the module covers both an ICMP and a TCP variant across ICMP_rand_source.pcapng, ICMP_rand_source_larg_data.pcapng and TCP_rand_source_attacks.pcapng. In the ICMP variant, a single host like 192.168.10.5 sends ICMP Echo Replies out to many different random public IPs, because it received spoofed ping requests that claimed to come from all of them.
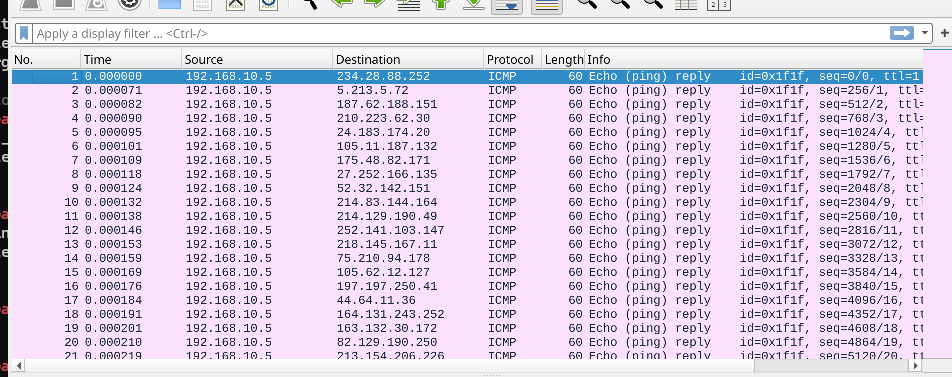
As with Smurf, attackers may fragment these to draw out more resource exhaustion.
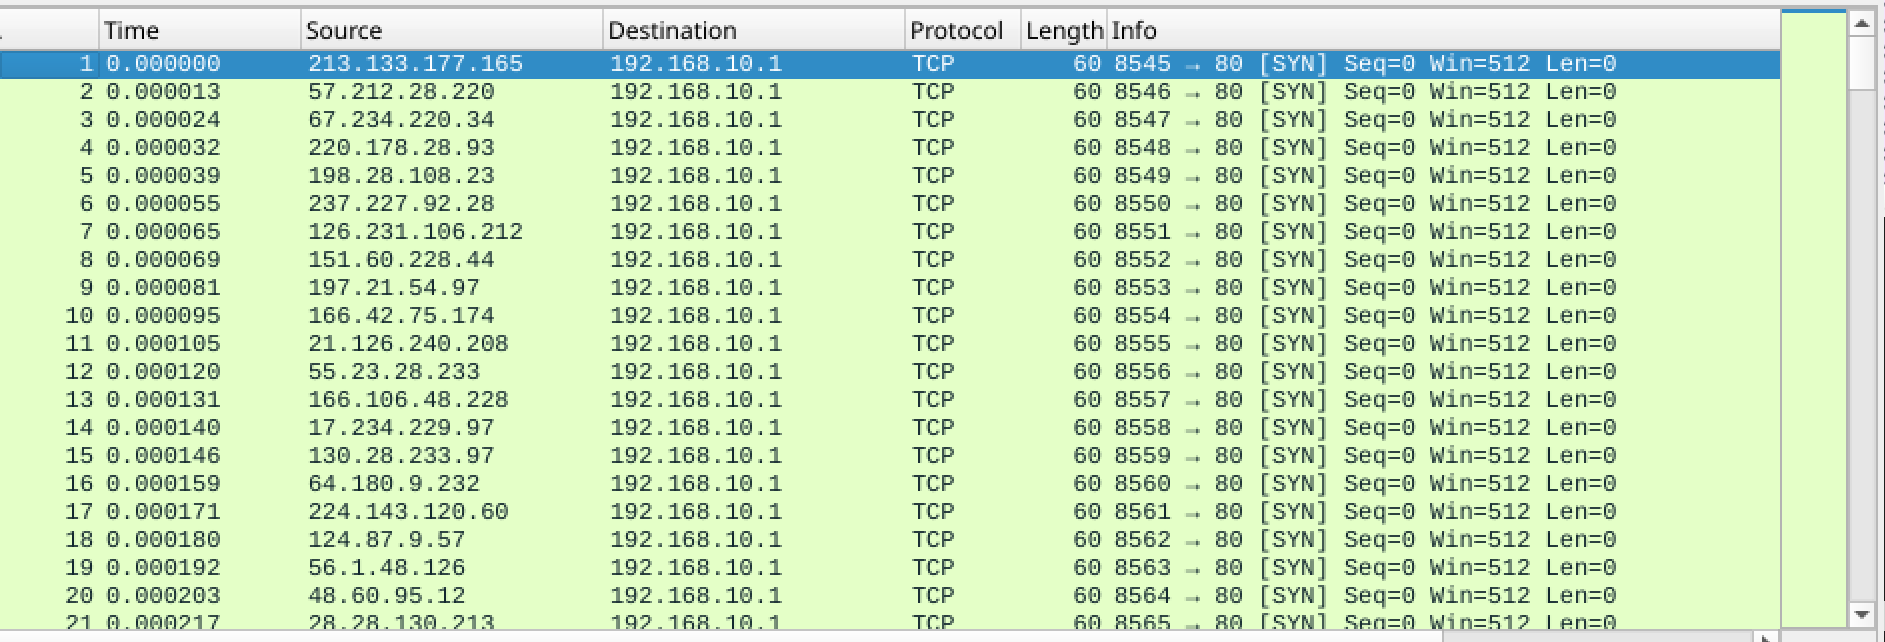
The TCP variant is the same idea, with a target like 192.168.10.1 getting hit on a single port (port 80) by many apparent public source IPs sending SYN packets, for example:
213.133.177.165 -> 192.168.10.1  8545 -> 80 [SYN]
57.212.28.220   -> 192.168.10.1  8546 -> 80 [SYN]
67.234.220.34   -> 192.168.10.1  8547 -> 80 [SYN]
Three things give it away against real traffic: single port utilisation from random hosts, an incremental base port with a lack of randomisation (the 8545, 8546, 8547 above), and identical length fields. Legitimate web server traffic, by contrast, has varying packet lengths and randomised client base ports.
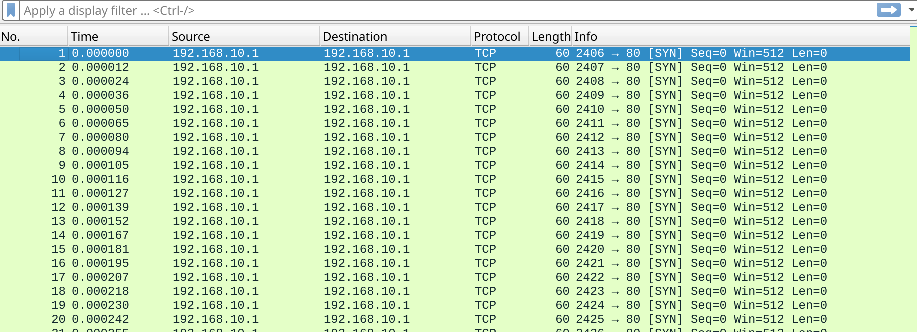
LAND attacks spoof the source IP to be identical to the destination IP, captured in LAND-DoS.pcapng. You see the host sending TCP SYN packets to itself, 192.168.10.1 -> 192.168.10.1 on port 80. It works through sheer volume and port reuse, and if all the base ports get occupied it becomes extremely difficult to establish legitimate connections to that host.
Initialization Vector (IV) generation attacks are a legacy wireless case, specific to WEP. The attacker captures, decrypts, crafts and re-injects packets with modified source and destination IPs to force the access point to generate new IVs rapidly, building up a decryption table for a statistical attack. The traffic indicator is an excessive amount of repeated packets sent back and forth between hosts.
IP Time-to-Live (TTL) Attacks
TTL evasion is aimed at getting past a firewall, IDS or IPS by setting an anomalously low TTL on crafted packets. As a packet crosses each router or host, its TTL drops by 1, and when it hits 0 the packet is discarded and the router at that hop sends an ICMP Time Exceeded back to the source. The trick works when the security control sits farther down the path than the point where the packet expires, or when the monitoring sensor sees a different path than the target does, so the sensor never inspects the packet that still reaches the host.
In ip_ttl.pcapng this shows up most often in high-volume port scanning.
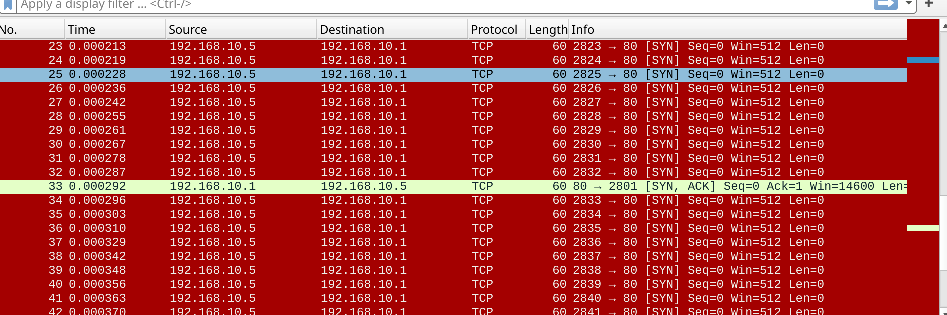
The giveaway is a returned SYN, ACK from one of your legitimate service ports on the affected host, which means the scanning packet actually reached the host and got a response, having successfully evaded the intermediate firewall. Opening the IPv4 details of that incoming SYN reveals the intentionally low TTL, such as a Time to Live of 3.
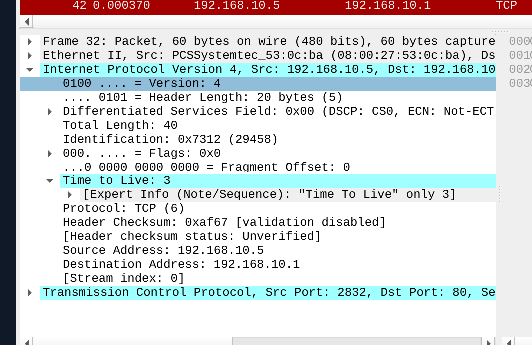
The prevention is a perimeter control that discards incoming packets that do not meet a high enough TTL threshold, which blocks this style of crafting.
TCP Handshake Abnormalities
A normal TCP connection is the three-way handshake: the client sends SYN (“can I connect?”), the server replies SYN/ACK (“yes”), and the client finishes with ACK (“established”). When attackers scan TCP services, they manipulate the flags instead of completing that handshake, and those abnormal flag patterns are what reveal scanning, firewall probing and evasion. The five scan types below are all just different flag combinations, and the pattern to worry about is always one source hitting many ports or hosts with incomplete handshakes, not any single odd packet.
A SYN scan fires many SYN packets to check which ports are open, and usually never completes the handshake, often sending an RST after the server’s SYN/ACK. Open ports answer SYN/ACK, closed ports answer RST/ACK.
tcp.flags.syn == 1 && tcp.flags.ack == 0
The shorter exact form is tcp.flags == 0x002.
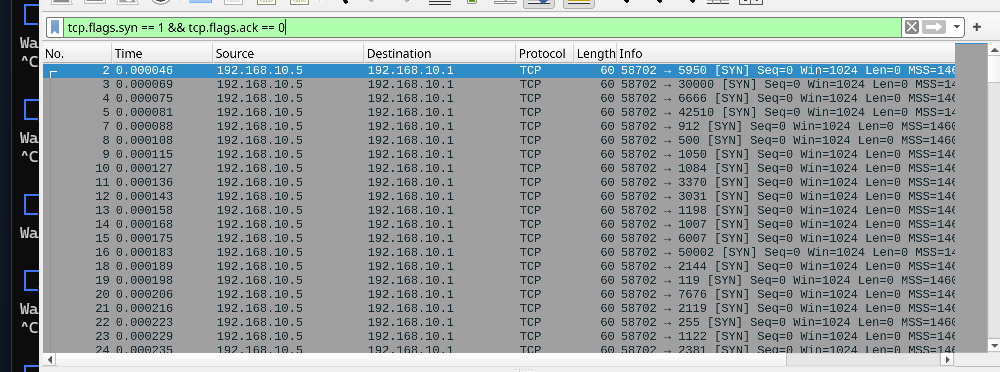
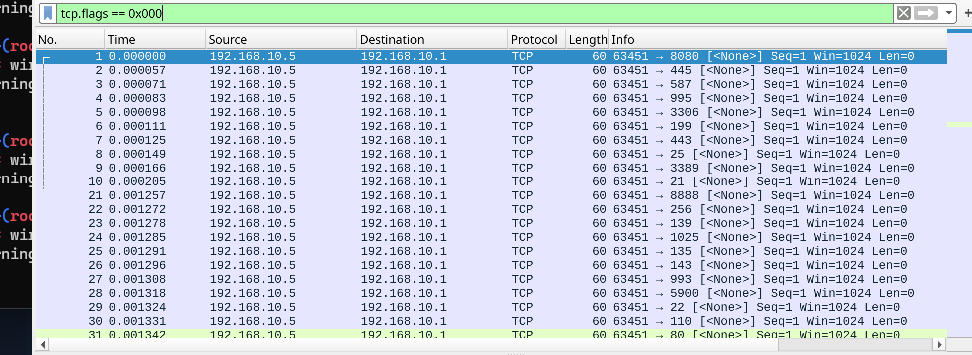
A NULL scan sends TCP packets with no flags set at all, which is suspicious because normal TCP traffic should have at least one flag. Open ports usually stay silent, closed ports reply RST.
tcp.flags == 0x000
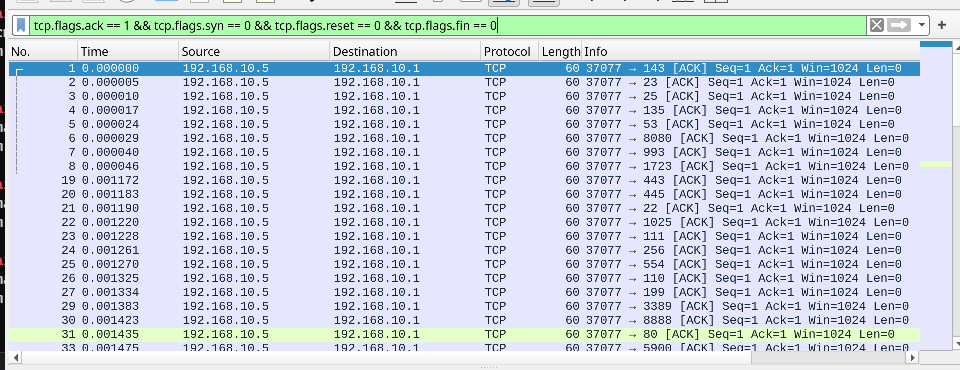
An ACK scan sends standalone ACK packets to test firewall rules and filtering behaviour rather than to find open ports. Unfiltered ports reply RST, filtered ports drop the packet or stay silent.
tcp.flags.ack == 1 && tcp.flags.syn == 0 && tcp.flags.reset == 0 && tcp.flags.fin == 0
The shorter exact form is tcp.flags == 0x010.
A FIN scan sends packets with only the FIN flag set. Since FIN normally shows up when a connection is ending, a pile of FIN packets with no established session is suspicious. Open ports usually stay silent, closed ports reply RST.
tcp.flags.fin == 1 && tcp.flags.syn == 0 && tcp.flags.ack == 0
The shorter exact form is tcp.flags == 0x001.
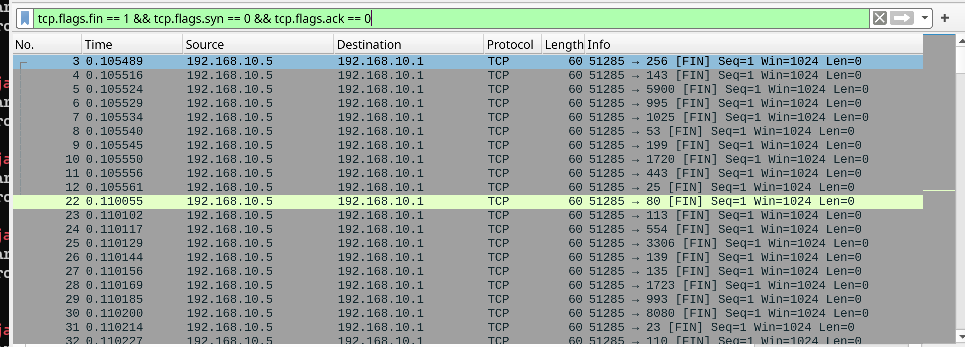
An Xmas scan lights up multiple unusual flags at once, commonly FIN, PSH and URG together, which is where the name comes from. Open ports usually stay silent, closed ports reply RST.
tcp.flags.fin == 1 && tcp.flags.push == 1 && tcp.flags.urg == 1
The shorter exact form is tcp.flags == 0x029.
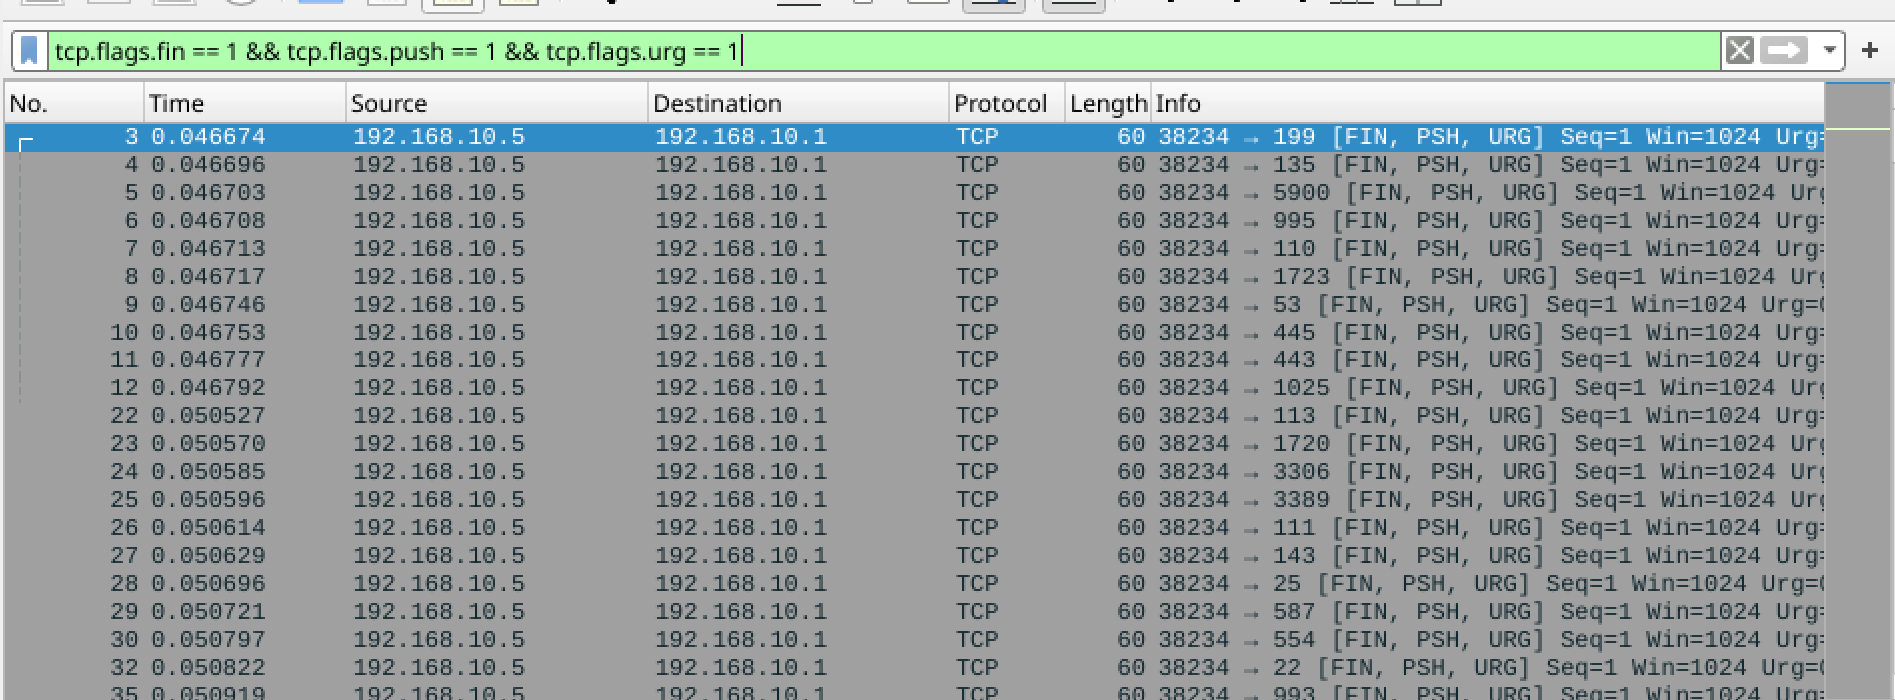
The quick mental summary is that a SYN scan is many SYN packets, a NULL scan is packets with no flags, an ACK scan is many ACK-only packets, a FIN scan is many FIN-only packets, and an Xmas scan is FIN plus PSH plus URG together. For NULL, FIN and Xmas scans an open port stays silent and a closed port sends RST, while for a SYN scan an open port sends SYN/ACK and a closed port sends RST/ACK. And the practical reminder is that one abnormal packet is not automatically malicious. The suspicion comes from the pattern: repeated unusual flags, across many ports or hosts, with no completed three-way handshakes.
For reference, the full TCP flag set:
| Flag | Full Name | Hex Value | Wireshark Field | Meaning | Common Use |
|---|---|---|---|---|---|
SYN |
Synchronize | 0x002 |
tcp.flags.syn |
Starts a TCP connection | First step of TCP handshake |
ACK |
Acknowledgment | 0x010 |
tcp.flags.ack |
Confirms received data | Used after connection starts |
SYN/ACK |
Synchronize + Acknowledgment | 0x012 |
tcp.flags.syn == 1 && tcp.flags.ack == 1 |
Server accepts connection request | Second step of TCP handshake |
FIN |
Finish | 0x001 |
tcp.flags.fin |
Gracefully closes a TCP connection | Normal connection teardown |
RST |
Reset | 0x004 |
tcp.flags.reset |
Forcefully resets/terminates connection | Closed port response or reset |
PSH |
Push | 0x008 |
tcp.flags.push |
Push data immediately to application | Active data transfer |
URG |
Urgent | 0x020 |
tcp.flags.urg |
Marks urgent data | Rare in normal traffic |
ECE |
ECN Echo | 0x040 |
tcp.flags.ece |
Congestion notification | Network congestion signaling |
CWR |
Congestion Window Reduced | 0x080 |
tcp.flags.cwr |
Sender reduced congestion window | ECN congestion response |
And the scan types side by side:
| Scan Type | Flag Pattern | Wireshark Filter | Meaning | Response Pattern |
|---|---|---|---|---|
| SYN Scan | SYN only |
tcp.flags == 0x002 |
Checks ports without completing the handshake | Open port sends SYN/ACK then scanner sends RST. Closed port replies RST/ACK |
| NULL Scan | No flags | tcp.flags == 0x000 |
Abnormal TCP packet with no flags | Open port usually silent. Closed port replies RST |
| ACK Scan | ACK only |
tcp.flags == 0x010 |
Tests firewall and filtering behaviour | Unfiltered port replies RST. Filtered port no response |
| FIN Scan | FIN only |
tcp.flags == 0x001 |
Uses the close flag without a real session | Open port usually silent. Closed port replies RST |
| Xmas Scan | FIN + PSH + URG |
tcp.flags == 0x029 |
Multiple unusual flags set together | Open port usually silent. Closed port replies RST |
| RST Response | RST or RST/ACK |
tcp.flags.reset == 1 |
Often a closed port or reset connection | After a SYN probe, likely a closed port. During a real session, a reset |
TCP Connection Resets and Hijacking
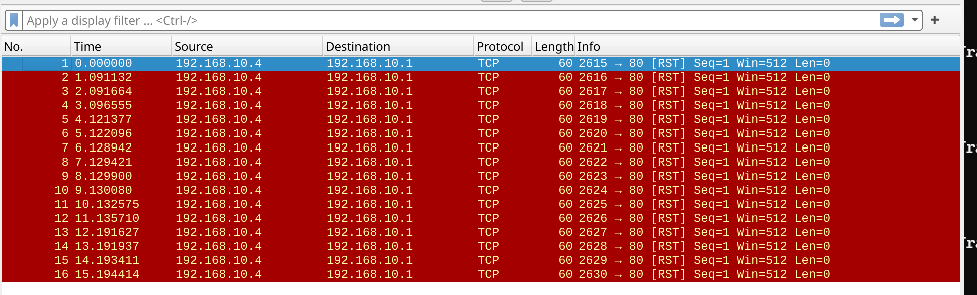
A TCP reset attack is a combination of a few conditions working together. The attacker spoofs the source address to be the affected machine’s, sets the RST flag on the TCP packet to terminate the connection, and specifies the destination port to match one currently in use by one of the machines. In the capture this shows up as an excessive amount of traffic going to one port, and another tell is the MAC address looking different from the normal one for that host.
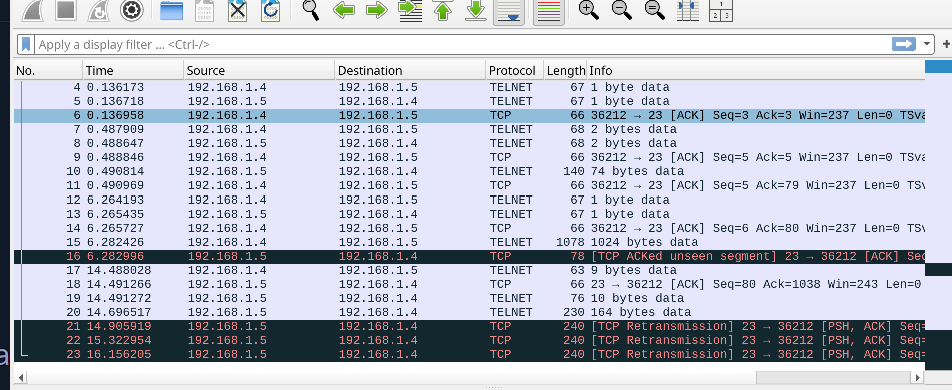
TCP connection hijacking is a step beyond that. The attacker injects a fake packet into a live session (Telnet here) using the correct TCP sequence number. The flow is that a normal Telnet session is running, the attacker watches the sequence and ACK numbers, spoofs one side’s IP, and injects data or commands into the session. The TCP stream then goes visibly weird, with unseen ACKs, retransmissions and sequence mismatches. In the capture, the Telnet connection between 192.168.1.4 and 192.168.1.5 shows exactly that kind of stream desynchronisation, which is the sign of hijacking or packet injection.
ICMP Tunneling
ICMP tunneling is when an attacker hides data inside ICMP ping request and reply packets to bypass network controls or exfiltrate data, stuffing the payload into the ICMP data field. Since normal ping traffic is small, the first filter is just for large ICMP packets:
icmp && frame.len > 1000
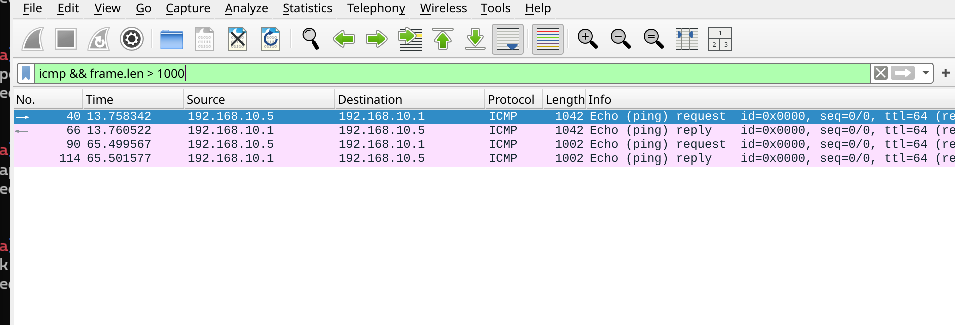
Because tunneling often carries enough hidden data to force fragmentation, you can confirm that with:
ip.proto == 1 && (ip.flags.mf == 1 || ip.frag_offset > 0)
The logic is simply that normal ICMP is small and regular, while tunneling is repeated ICMP with large payloads, fragmentation, or unusual data inside the body. The prevention is to block or restrict ICMP where it is not needed, and to inspect request and reply payloads for hidden or abnormal data.
Application-Layer Attacks
At the top of the stack the attacks look less like crafted packets and more like abused protocols: web requests, TLS handshakes and DNS queries doing things they should not. The advantage here is that a lot of this traffic is readable, so following a stream often shows the payload directly.
HTTP Fuzzing
HTTP directory fuzzing is an information-gathering technique where an attacker generates a lot of traffic to map out every page and directory on a web server. It shows up as rapid requests in quick succession from a single host, together with an influx of HTTP 404 responses as the scanner guesses paths that do not exist.
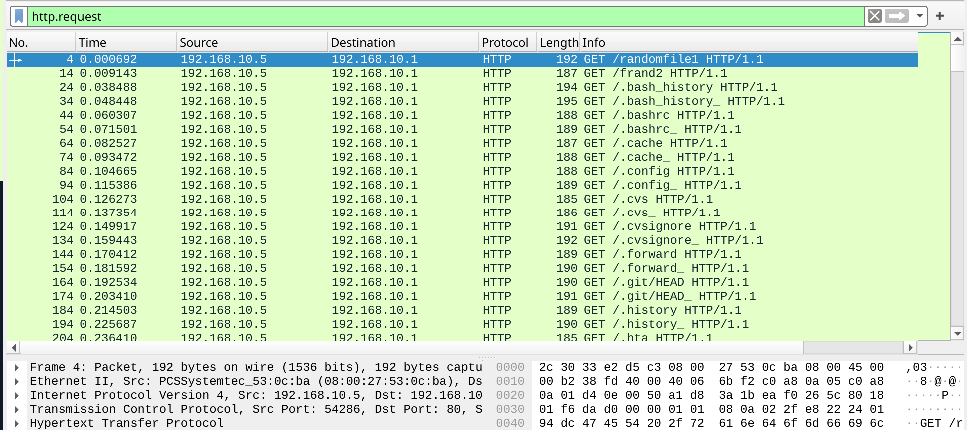
So the two markers are a host repeatedly requesting files that do not exist (404), and sending them in rapid succession. You can confirm the same thing in Apache access logs from the CLI:
cat access.log | grep "192.168.10.5"
cat access.log | awk '$1 == "192.168.10.5"'
There is also a parameter or IDOR flavour of fuzzing. In Wireshark, http or http.request gives you the requests without the response clutter, and you can isolate a suspect host with:
http.request and ((ip.src_host == <suspected IP>) or (ip.dst_host == <suspected IP>))
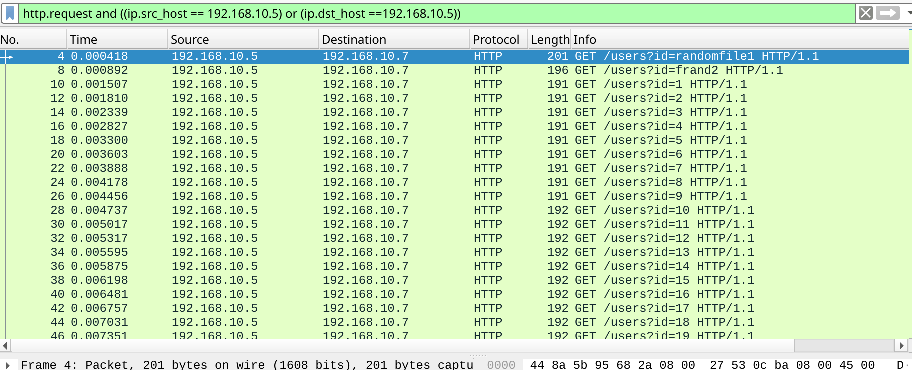
Right-clicking a request and following the HTTP stream reconstructs the full payload, and you can confirm it via the TCP stream as well.
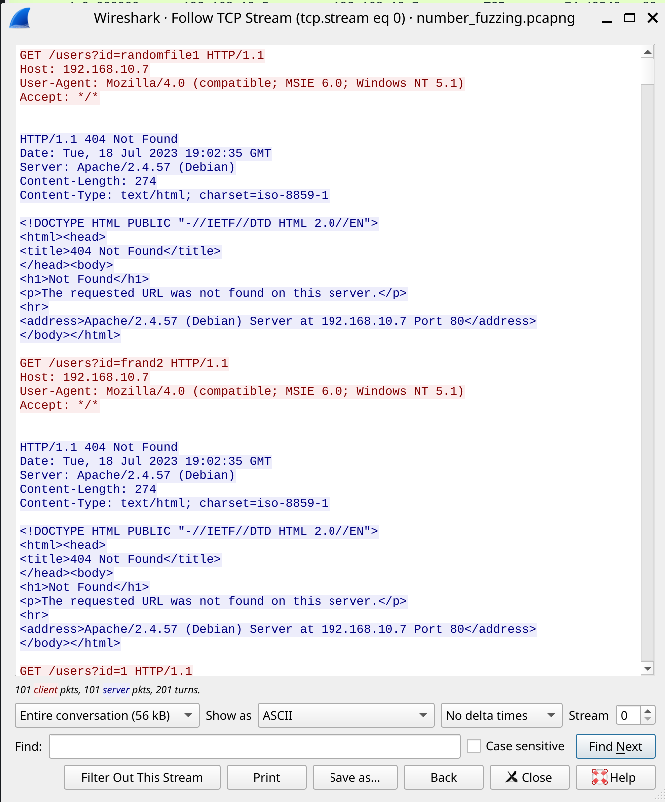
Attackers evade simple threshold detection by staggering requests over longer periods or launching from multiple host IPs, and instead of directories they may target dynamic elements like id fields or manipulate JSON parameters (for example changing return=max to return=min) to hunt for IDOR. On defence, you can harden the web config to return misleading response codes that throw off scanners, and deploy a WAF with active rules to block the scanning IPs.
Strange HTTP Headers and Request Smuggling
Header manipulation and request smuggling are quieter than fuzzing, with no obvious high-volume traffic to catch. Instead you detect them by spotting irregular request behaviour. The classic case is an attacker using a proxy tool like Burp Suite to modify the Host header to a restricted value such as 127.0.0.1 or admin to reach something they should not. To find it, limit to requests and filter out your web server’s legitimate host so only the manipulated ones remain:
http.request and (!(http.host == "192.168.10.7"))
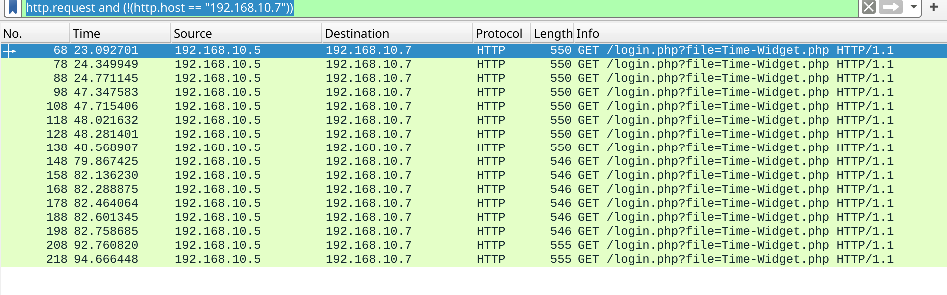
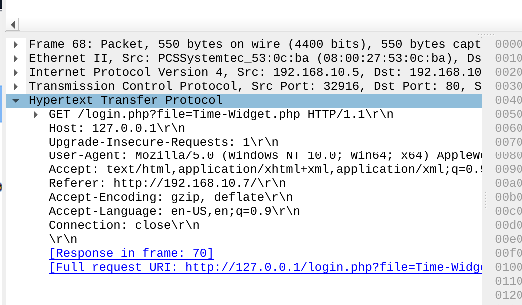
The manipulated requests stand out with host values like 127.0.0.1 or admin. The mitigation is proper virtualhost and access configuration, and keeping the web server updated.
Request smuggling with CRLF injection is the more dangerous version. The attacker injects encoded CRLF sequences (%0d%0a) into query parameters, and if the server is vulnerable (for example Apache CVE-2023-25690) it decodes them and processes a smuggled second request under the guise of a single transaction. In Wireshark, HTTP 400 Bad Request responses are a clear indicator of smuggling or CRLF attempts, while an HTTP 200 mapped to a smuggled payload means the exploit got through:
http.response.code == 400
Following one of these streams shows the encoded request from the client, which looks like this on the wire:
GET%20%2flogin.php%3fid%3d1%20HTTP%2f1.1%0d%0aHost%3a%20192.168.10.5%0d%0a%0d%0aGET%20%2fuploads%2fcmd2.php%20HTTP%2f1.1%0d%0aHost%3a%20127.0.0.1%3a8080%0d%0a%0d%0a
And decodes on the server into two requests instead of one:
GET /login.php?id=1 HTTP/1.1 Host: 192.168.10.5
GET /uploads/cmd2.php HTTP/1.1 Host: 127.0.0.1:8080
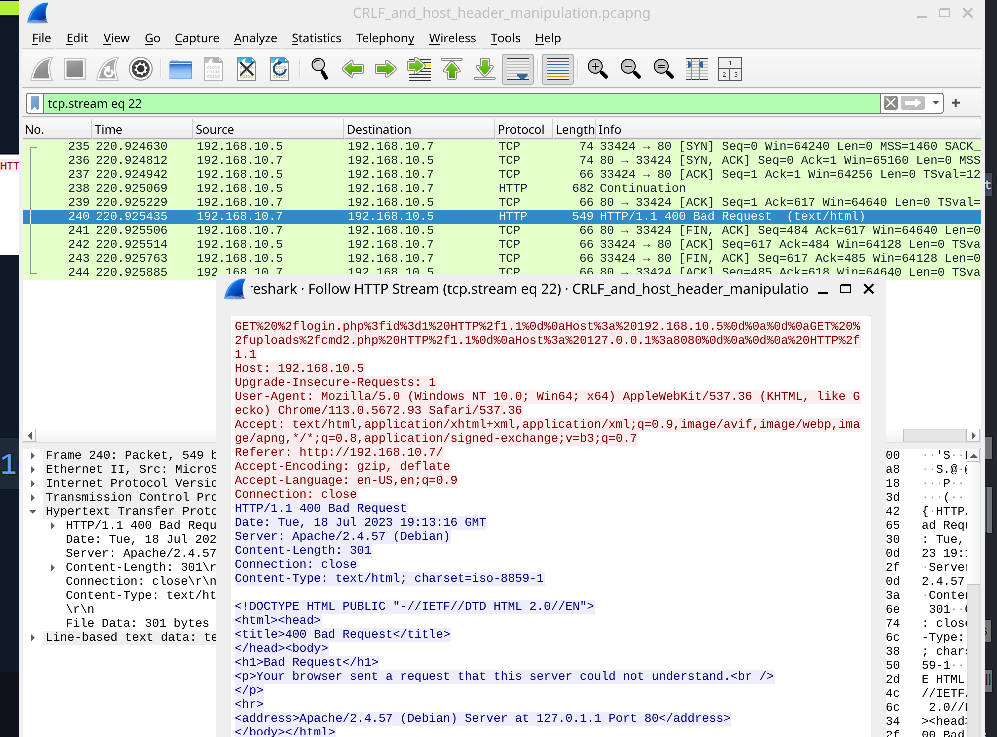
The core problem is that a vulnerable proxy rewrite rule lets one external HTTP request become two backend requests, and the second one can target an internal-only service like 127.0.0.1:8080 that the attacker should never be able to reach.
XSS and Code Injection
Detecting Cross-Site Scripting and code injection in traffic is about recognising subtle communication patterns rather than volume. Often the first sign is a steady stream of HTTP requests to an unrecognised internal server, for example between 192.168.10.3 and 192.168.10.5, and in real scenarios the stolen cookies, tokens and session values are usually encoded or encrypted in transit to hide the exfiltration.
The indicators to watch for are a large volume of HTTP requests to an unfamiliar internal server, HTTP GET requests that carry cookie parameters but come back as 404, and user credentials or session values that are obfuscated as they move across the network.
Finding the exact origin is hard, but interactive elements like user comment areas are prime targets. If an attacker posts a malicious script into a comment, other visitors’ browsers execute it, which lets the attacker hijack active sessions. Beyond client-side scripts, the same input fields can be used to inject PHP payloads, typically to establish persistent command and control or to run a single targeted command on the host.
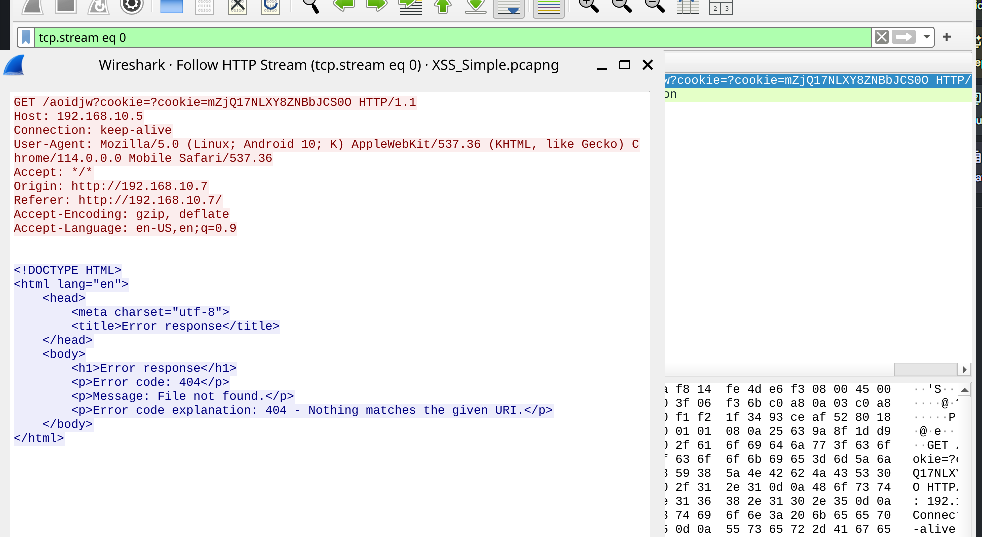
If you find a live exploit in a comment area, the response is to delete the malicious comment immediately, in most cases bring the server offline to fix the underlying vulnerability before it persists, and put proper input sanitisation in place so user-submitted data is never interpreted as executable code.
SSL and TLS Renegotiation
HTTPS depends entirely on the TLS handshake to negotiate encryption and establish keys before any data moves, and because that handshake is CPU-intensive, it becomes a target. It is worth having the handshake steps clear first. The client sends a Client Hello with its supported versions, cipher suites and a random nonce. The server responds with a Server Hello picking the highest mutual version and cipher plus its own nonce. The server sends its certificate with its public key to prove identity. The client generates a premaster secret, encrypts it with the server’s public key and sends it, and the server decrypts it with its private key so both sides share the same raw secret. Both then derive the symmetric session keys from the nonces and premaster secret, exchange Finished messages containing an encrypted hash of the handshake to confirm they calculated identical keys, and only then exchange actual data over the encrypted channel.
The key derivation itself goes through a precise progression. Both sides first agree on a raw premaster secret, either by encrypting the client-generated secret with the server’s public key or by calculating it via Diffie-Hellman (PremasterSecret = DH_KeyAgreement(ServerDHPublicKey, ClientDHPrivateKey)). They run that premaster secret and the hello nonces through a Pseudo-Random Function to get the master secret (MasterSecret = PRF(PremasterSecret, "master secret", ClientNonce + ServerNonce)), which ties the keys to this specific session and prevents replay. The master secret is not used to encrypt directly. A second PRF expansion produces a larger KeyBlock (KeyBlock = PRF(MasterSecret, "key expansion", ServerNonce + ClientNonce)), which is then sliced into the client and server write MAC keys for integrity, the client and server write keys for actual encryption, and the client and server write IVs to initialise the ciphers.
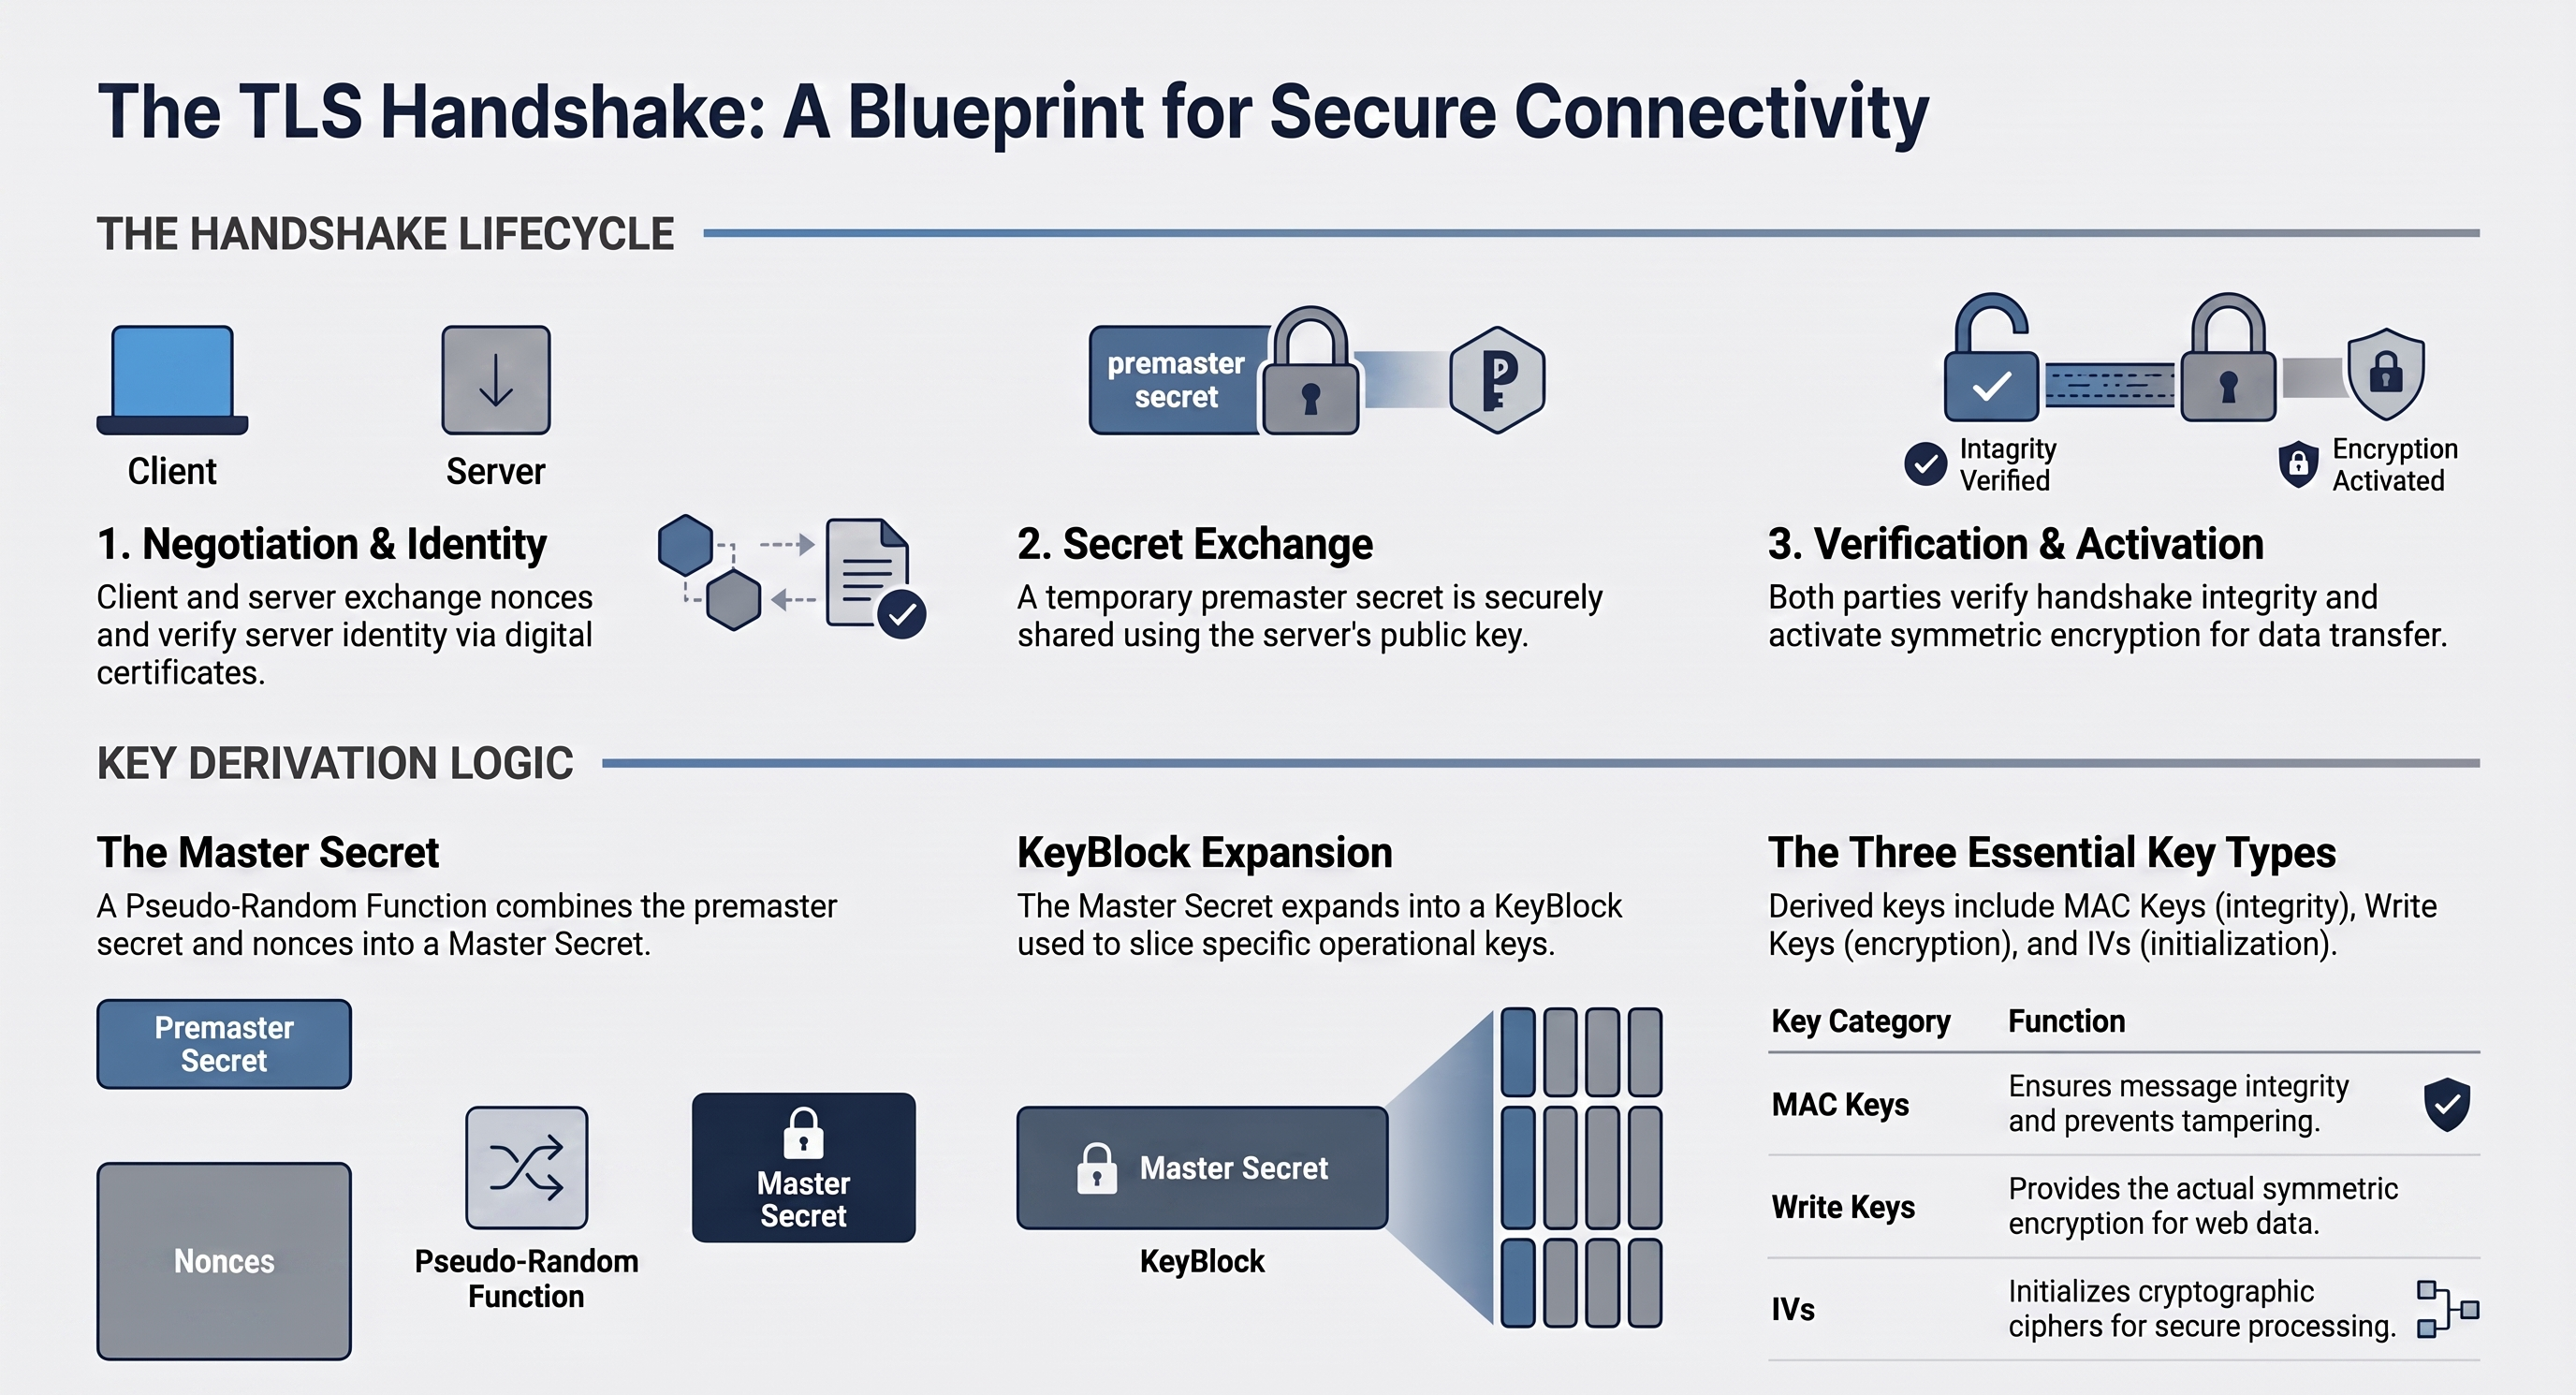
Because deriving these keys is so expensive, an SSL renegotiation attack repeatedly forces the server to renegotiate an already active session, either down to a weaker cipher or just to re-run the key derivation. Attackers do this for three reasons: to cause a Denial of Service by exhausting the server’s CPU through continuous re-keying, to attempt cipher suite downgrades that expose weaker implementations, or for cryptanalysis by triggering repeated handshakes to study the patterns.
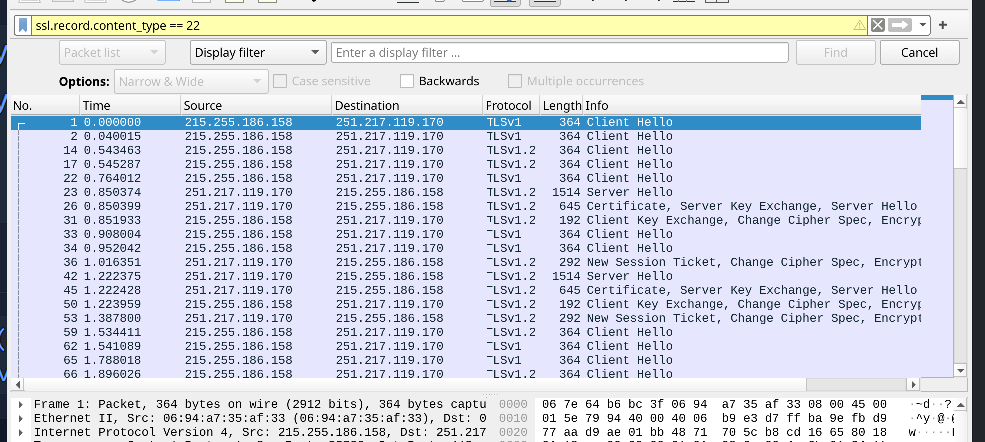
To catch it, isolate the handshake records (Content Type 22):
ssl.record.content_type == 22
The two indicators of abuse are multiple Client Hellos from a single source IP within an unusually short window, which is the most prominent sign, and out-of-order handshake messages, most notably a Client Hello arriving after a secure connection has already been established and data is flowing.
DNS Abuse: Enumeration and Tunneling
DNS is high-volume and complex to monitor, and because queries pass freely through firewalls, it is a favourite for stealthy activity. To spot the anomalies you need the baseline first. Forward lookups translate a name into an IPv4 (A) or IPv6 (AAAA) address, walking from the local cache through recursive resolvers, root servers, TLD servers and finally the authoritative name servers. Reverse lookups map a known IP back to its FQDN using the PTR record. Other common records include CNAME for aliases, MX for mail servers, NS for authoritative name servers, TXT for text strings, and SOA for zone admin data.
DNS enumeration is reconnaissance to map an organisation’s internal domains and subdomains, and it shows up as a sudden, massive spike in DNS traffic from a single host. The giveaway is that the query stream often ends with requests for ANY records, which is the signature of an automated tool trying to pull every record for a zone.
DNS tunneling abuses the protocol to exfiltrate data, run command and control such as botnet traffic, or bypass proxies that only watch HTTP and HTTPS. The indicator is a high volume of TXT records from a single host, with the stolen data appended directly into the TXT fields. That data is almost never plaintext. It is routinely encoded (often double or triple base64) or encrypted, so you locate the strings in Wireshark, extract them, and pipe them through something like base64 -d to reveal the payload.
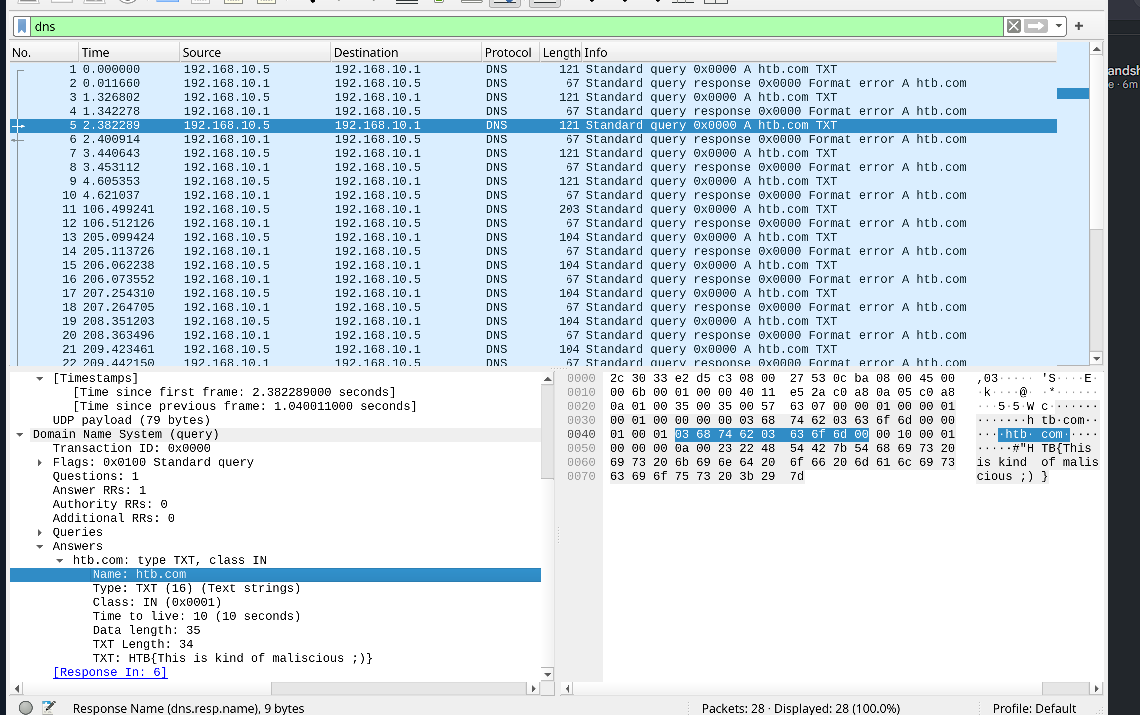
In many cases the data is encoded or encrypted, and it looks like this in the capture.
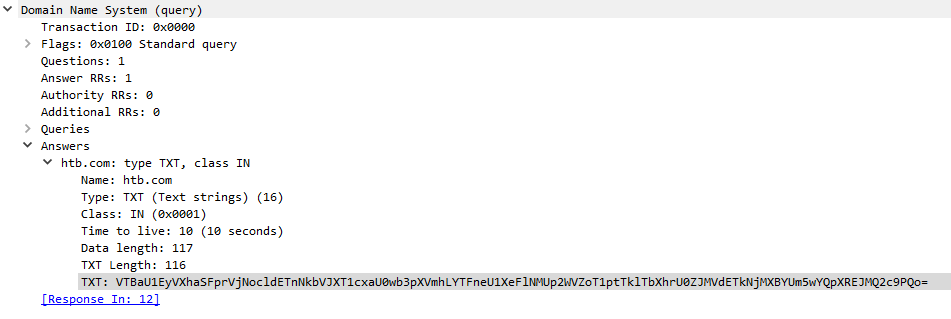

Two advanced twists are worth knowing. Domain Generation Algorithms have malware dynamically generate random domains to reach C2, which makes static domain blocklists nearly useless. And Interplanetary File System (IPFS) abuse uses the peer-to-peer IPFS network to store and pull malicious files, and because it is decentralised and P2P, tracking or blocking those transfers (for example traffic to URLs like cloudflare-ipfs.com) is exceptionally difficult.
Telnet and UDP Tunneling
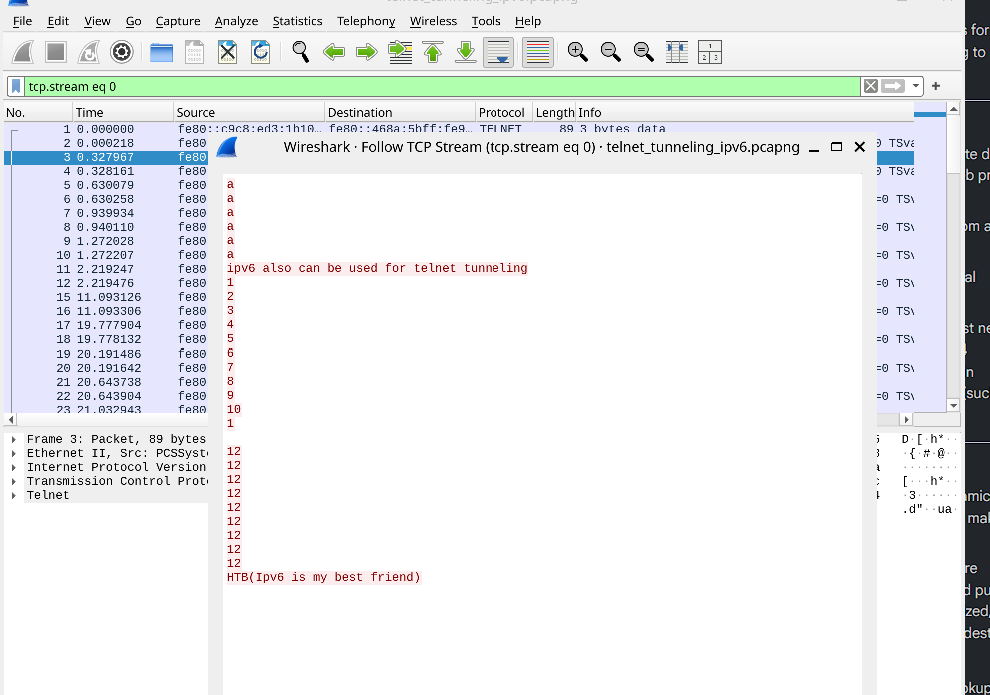
Securing the boundary also means watching outdated and connectionless protocols, because attackers lean on Telnet and UDP for quiet exfiltration and tunneling. Telnet is an unencrypted, plaintext protocol from the 1970s that SSH has largely replaced, but legacy systems still use it, and its lack of encryption makes it easy to tunnel through and exfiltrate over. Two things stand out: because Telnet can be redirected to any port, persistent communications over a non-standard port (like 9999) are worth following, and doing so on those high-port sessions often reveals unencrypted exfiltration. And unless a network is explicitly running IPv6, the sudden appearance of IPv6 traffic is a strong indicator of compromise, since attackers use IPv6 to set up covert Telnet tunnels. You can isolate a suspected IPv6 Telnet session with:
((ipv6.src_host == fe80::c9c8:ed3:1b10:f10b) or (ipv6.dst_host == fe80::c9c8:ed3:1b10:f10b)) and telnet
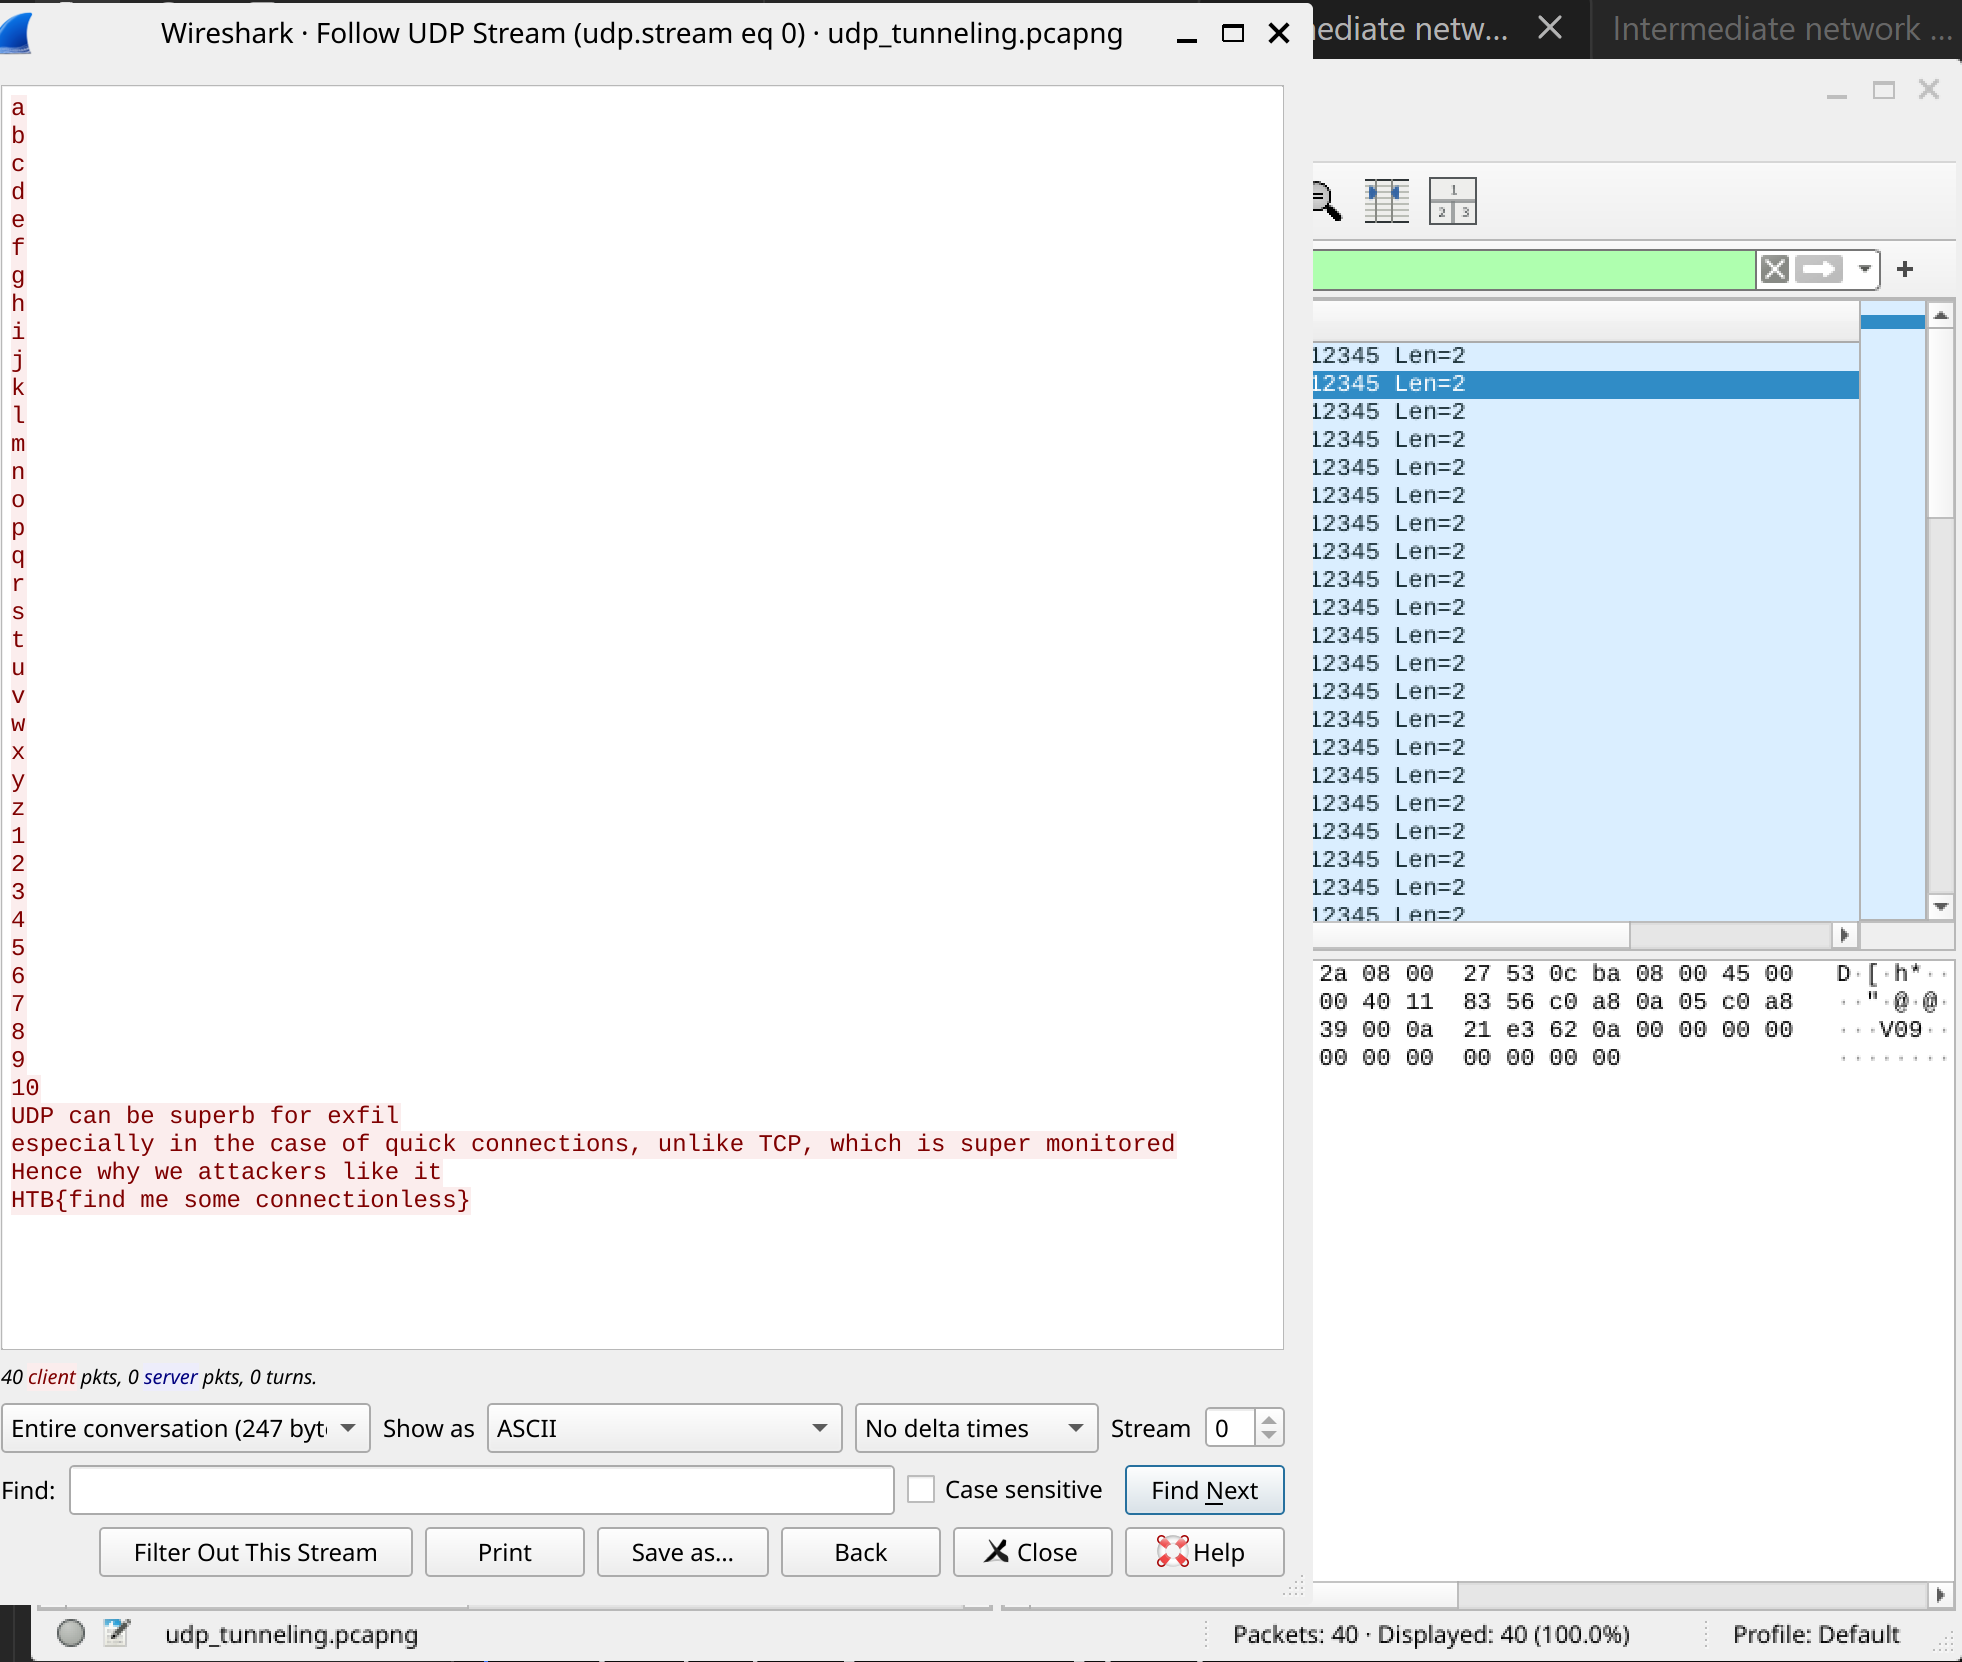
UDP tunneling exploits the fact that UDP is connectionless and delivers packets immediately with no formal session. Attackers like it because there is no connection negotiation so it is fast, and UDP is often monitored less rigorously than TCP, which makes it effective for undetected exfiltration. In udp_tunneling.pcapng you detect it by looking for consistent packet lengths from a single host that fall outside normal patterns, and following the UDP stream to reconstruct and decode the payload. The care needed here is not flagging legitimate UDP, so you have to distinguish tunneling from real-time applications like streaming, gaming and voice or video, from DNS and DHCP, and from SNMP and TFTP on legacy systems.
Skills Assessment
Two PCAPs to classify, each asking for the specific attack.
funky_dns.pcap. Before touching it I lined up the three candidate DNS attacks so I was answering deliberately rather than guessing. DNS Tunneling hides data inside DNS queries and responses, so a normal “what is the IP of google.com” becomes something like a8sd7as9d7as9d7.secretdata.attacker.com where the long random subdomain carries the hidden data, and you look for long weird domain names, random or encoded subdomains, many queries to the same parent domain, and TXT or CNAME records. DNS Amplification abuses DNS servers to flood a victim, spoofing the victim’s IP as the request source so the servers send large replies to a victim that never asked, and you look for many large responses from many servers with no matching queries, often ANY queries. DNS Flooding just overwhelms a DNS server with too many queries, so you look for a very high number of queries hitting the same server with random or nonexistent domains, mostly requests rather than large replies.
| Attack | Main idea | Victim |
|---|---|---|
| DNS Tunneling | Hide data inside DNS | Network / data security |
| DNS Amplification | Many DNS servers send big replies to a victim | Victim host / network |
| DNS Flooding | Too many DNS queries hit the DNS server | DNS server |
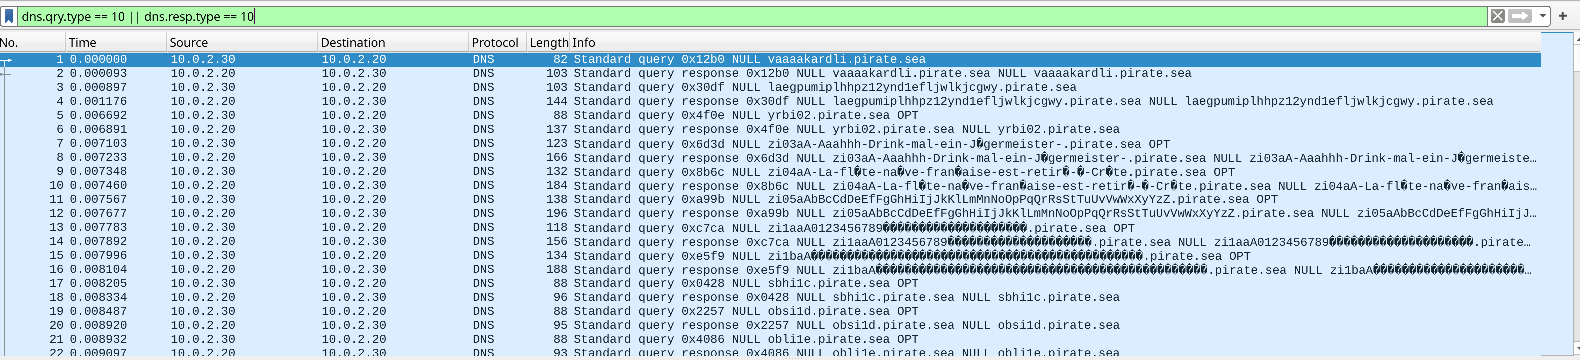
Into the analysis, the key was the DNS NULL record, which is a record type that can carry arbitrary raw data. Filtering for it showed that almost every packet in the capture used it:
dns.qry.type == 10 || dns.resp.type == 10
To strengthen that, I checked for oversized DNS packets carrying more data than normal:
dns && frame.len > 512
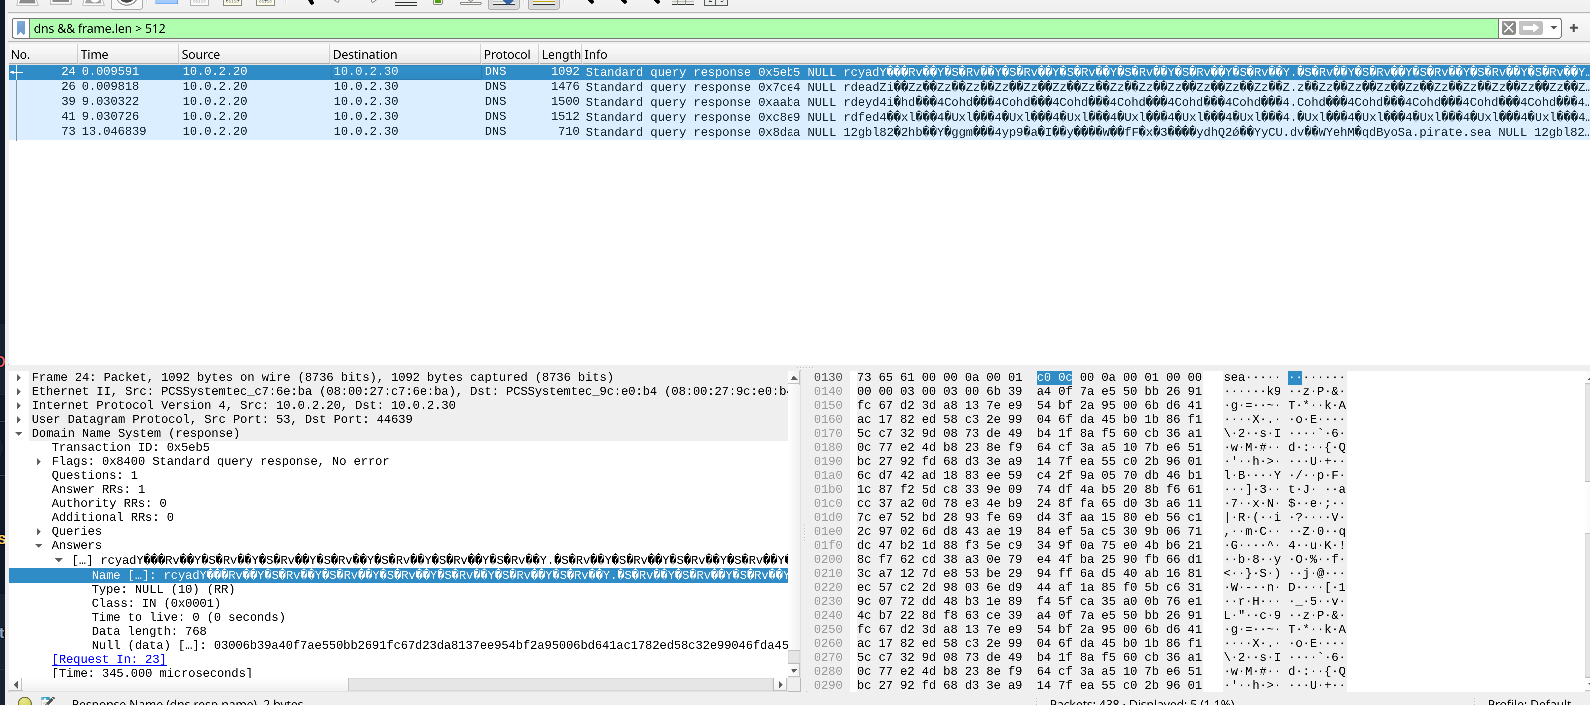
The NULL record usage plus the oversized packets makes the answer DNS Tunneling.
funky_icmp.pcap. The answer here is ICMP Tunneling, and I got there through packet size rather than volume. I started by checking the Echo Requests and Echo Replies, then went for large packets:
icmp.type == 8
icmp.type == 0
icmp && frame.len > 1000
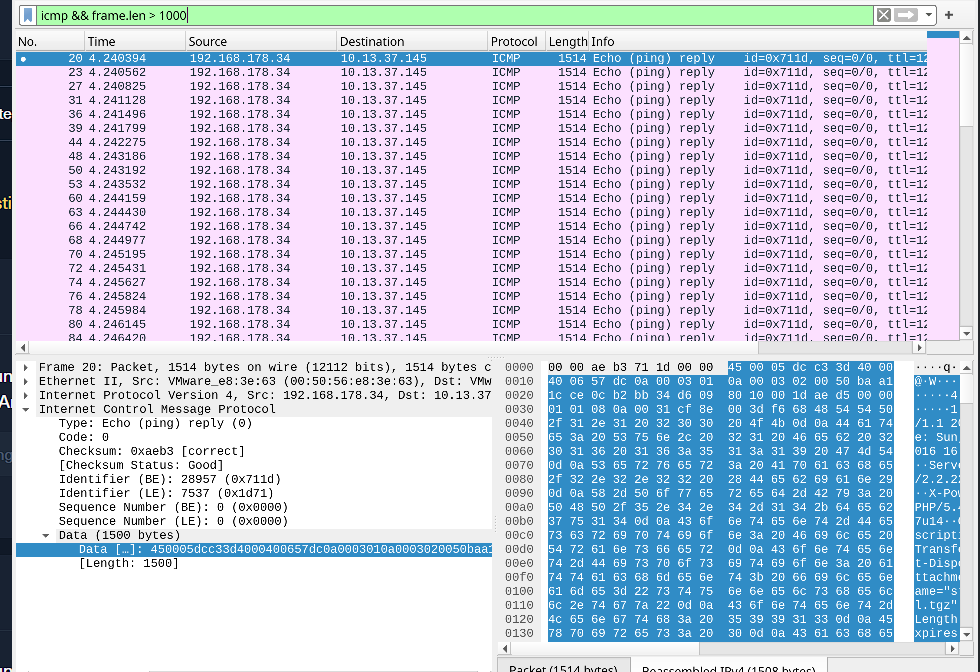
The icmp && frame.len > 1000 filter found 44 of 308 packets were large ICMP, all Echo Replies from 192.168.178.34 to 10.13.37.145 with a length mostly of 1500 bytes. Normal ping traffic is small, so large repeated ICMP payloads mean data is being carried inside ICMP, which is tunneling. It is not ICMP Flooding, because flooding is about a very high volume of small requests overwhelming a target and here the stronger clue is the large payload, not the count. And it is not a Smurf attack, because Smurf shows many hosts replying to one victim, whereas this traffic is mainly between just two hosts, 10.13.37.145 and 192.168.178.34.
Key Takeaway
- Pattern recognition, layer by layer. Almost every attack was one filter plus one signature.
- Link layer: ARP has no verification, so poisoning shows as duplicate MAC-to-IP mappings, and the attacker MAC’s history unmasks their real IP. Wireless management frames are unencrypted, so deauth floods (subtype 12) and open Evil-Twins (missing RSN block) are visible in the frames.
- Network and transport: the abused fields read straight off the packet - fragment offset for evasion, spoofed source IP for decoy/Smurf/random-source/LAND, low TTL for firewall evasion, and abnormal flag combos for the TCP scans.
- Application layer: the traffic is mostly readable, so following a stream shows the payload - 404 floods for fuzzing,
127.0.0.1in a Host header for smuggling,%0d%0afor CRLF, multiple Client Hellos for TLS renegotiation, TXT or NULL records for DNS tunneling. - Both skill assessment answers came from payload size and record type, not volume. The loudest signal is not always the right one.
References
- HTB Academy - Intermediate Network Traffic Analysis
- Wireshark - Display Filter Reference
- Aircrack-ng - airodump-ng and airmon-ng documentation
- MITRE ATT&CK - Network Sniffing (T1040)